
As a companion to the detail window post, an overview of the detail tool.
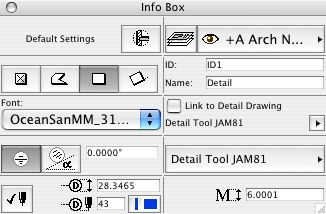
Info Box
Details are objects. We can use GDL to write detail markers that do exactly what we want, just like any other object. While there's one kind of detail window, we can get at the windows through many different objects, and we aren't limited to a few 'styles' built into Archicad.
(In AC8, this is also true for section markers. We could have our section marker actually cut the section. However, due to limitations in the GDL for sections, we would not currently be happy with our options.)
So to place a detail marker, we have to first choose it, like we would a window or door.
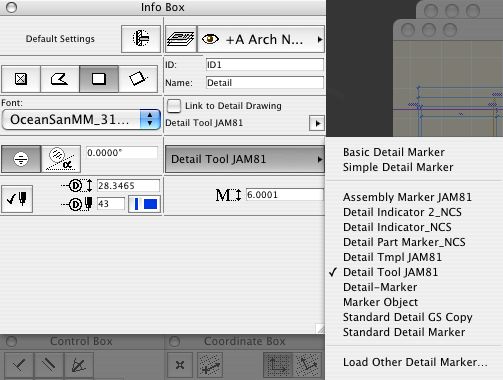
Selecting marker
When you place a detail marker, you have a choice. You can create a new detail window from the area described when you place the marker. Or you can link the marker to an existing detail window.
Creating a new window:
This method is similar to the patch. The geometry enclosed by whatever shape you draw appears in the detail window. Before you draw the marker, make sure the 'Link To Detail Drawing' box is unchecked, and put in a unique ID and name for the detail. After you draw the shape, you will get the hammer cursor. The next click determines where the reference tag will be placed, depending on the object.
Linking to an existing drawing:
Check the 'Link To Detail Drawing' box. You will get a dialog where you can select the drawing you want to reference. Note that the ID and Name will now be grayed out. Place the object as above. There are two ways to change the linked drawing. You can uncheck the 'Link' box and then check it again. You can open the settings of the detail and click the 'Browse' button under the detail name. To change the linked drawing of a placed detail marker, you must use this button.
Details can be opened just like sections. Right-click and select "Open Detail Drawing."
The detail area cannot be changed once the marker is placed, although the marker can be moved. Tip: Draw a fill, then magic-wand it with the detail tool. You can regenerate details by selecting Display | Detail Drawings | Rebuild From Source View. This is like renewing a section, and every bit as destructive. Copy any elements you wish to keep before renewing.
While the detail area cannot be modified, some detail markers have the option of switching to an 'Editable Polygon' mode, where the symbol can be modified using the arrow tool.
You cannot place a detail marker in a detail window. This is a drag.
Deleting a detail marker does not delete the detail window. It is allowed to have windows with no markers. We use these for the title block and such. To actually delete a detail, you must right-click on it in the project map and choose 'Clear.'
The most exciting feature of detail markers is the ability to automatically display drawing number and sheet number information in PlotMaker. More on this as we look at Detail Tool JAM81.
See Also:
Archicad 10 Reference Guide pg. 124
Detail Windows