
(I solved the screenshot problem by taking fewer screenshots.)
Pen table in Archicad...PM...
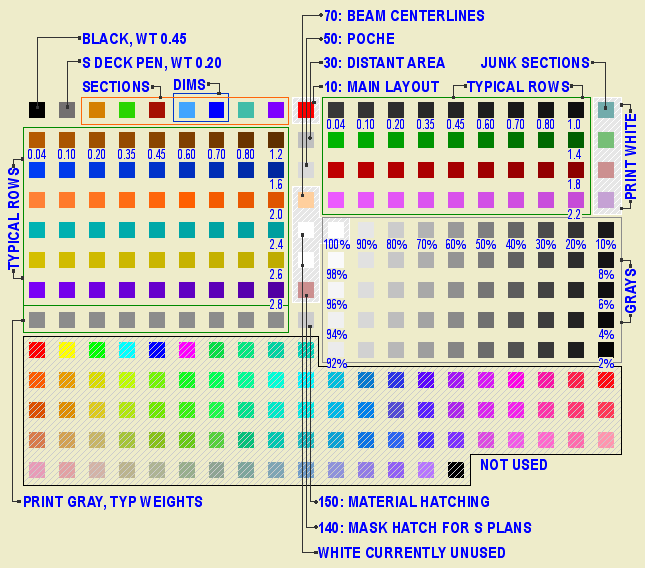
• Most work is done using the typical rows. The first pen is thinnest, at 0.04mm. Each sucessive pen is slightly thicker, up to 0.8 mm. The pens darken very slightly from left to right. The color change should not be apparent in general use.
For typical rows, the pens ending in the same number are the same weight. 11, 21, 31, 41, etc are all the same, they all turn black in layouts, where you can't tell them apart. Use the colors to differentiate parts of the model. Within the colors, set the line weight. Be consistent in what colors you use for different purposes. These are my habits:
Walls: Black (10's)
Roofs: Cyan (80's)
Doors & Windows: Brown (20's)
Soffits & Ceilings: Orange (60's)
Panel walls: Yellow (110's)
Counters: Purple (120's)
3D stairs, decks, terraces: Dark Red (50's)
Appliances, fixtures: Green (30's)
Main crown: Pink (70's)
When using the same color for different types of elements, make sure the types are spatially and conceptually separate. You can use your roof color for trim, but if you used it for ceilings it would get confusing.
For trim elements, use a different color for each type. I make the main crown pink and the baseboard dark red. If there's a chair or picture rail, I'll use cyan. This makes it easier to tell them apart when they're all stacked together.
Many CAD standards use color to represent output line weight. This is a help to drafting but is useless for model building. The most important issue for us is maintaining order and telling what is what. By using matching color for the plan, section, and fill pattern pens, the element will be recognizable from any point of view.
Fill patterns in section (brick, stone,etc) should have pen 11 (or 21, 31, 41,...). Composite separators that aren't set to hide should have pen 12 (or 22, 32, 42,...). Use a 13 (23, 33, 43,...) weight pen for edges in plan, such as counters and stair treads. Weight 15 (25,35,45,...) is used for cut elements in plan and section. I didn't forget 14 (24,34,44,...), it's used for the cut pen on elements that are either thin, curvy, or small, making the 15 weight seem too heavy.
The heavier pens in each row are there if you need them. You usually don't, and having so many is overkill, but we don't need the space. I use pen 36 instead of 35 for the cut pen of a site mesh, so the grade line is heavier.
The last pen of each typical row is consistent in color but not in weight. Each n9 pen is 0.2mm thicker than the previous; 19 is 1.0mm, 129 is 2.8mm. See image.
• Pen 1 is black. It has the same weight as pen 15. Pen 2 is an anomaly, we shouldn't use it but we do. It has the weight of pen 13. We use it for structural slabs and decks in plan. In section, these slabs use pens 11 and 15.
• Pens 3 through 9 are used for differentiating things that don't print, and therefore don't need a particular line weight. Especially S/E elements. I organize my sections like this:
Exterior elevations: 9 (purple)
Long sections: 4 (green)
Cross sections 3 (orange)
Interior elevations: 6 (cyan)
Wall sections: 7 (blue)
Sometimes you have to cut a section just to generate a detail; I use pen 5 (dark red) for those.
Pens 6 & 7 are used for dimensions. They have special weights and your dimensions won't look right with other pens.
• Multiples of ten are an odd group. They used to be mostly white, but lately we've found the need for several dedicated pens, and this is where they are.
Pen 10 is the primary guideline pen. It is white in PM.
Pens 20, 40, 60, and 80 are all white in PM. I use 20 for junk sections, and 80 for white masking fills. Use these pens for anything you need to see but not be distracted by, or anything that needs to print white but be visible in Archicad.
Pen 30 is for the marked distant area of a section. It is gray in Archicad, and plots as a fine black line. When using marked distant area, always "Use One Pen" and choose pen 30.
Pen 50 is the dedicated poche pen. It should be the background color of most cut elements in new construction.
Pen 70 is light orange, and is intended for beam centerlines. The default was white, but they were hard to see. It plots white, and the display options turn the beam centerlines off for output anyway.
Pens 90 & 110 are white. They don't have any particular purpose as of yet. Don't use them. When you need a white pen that's white, use pen 91. It will never change.
Pens 100, 120, 140, 160, 180 are part of the grayscale pens.
Pen 140 is a thick, white pen for making wall-masking hatches for structure plans. More on this later.
Pen 150 is for material (surface) fill patterns. This means cover fills, 2D floor finish fills, and the vectorial pen of materials.
• Pens 141-149 match the weights of a typical row, but they plot at 50% gray.
• Pens 91-100, 111-120, 131-140, 151-160, 171-180 are the grayscale pens. They plot as they are seen in Archicad.
Again: For white white, use pen 91, and no other. Also, never change the color of pen 91. The whiteness of 91 is deeply embedded in Archicad culture. Most (all?) library parts with white in their symbols use this pen, because it's a given that no one will change its color. Other white pens, you can't be sure. Eg, pen 30 used to be white, now it's not.
• Pens 161-170 & 181-255 are not used. Archicad provides 255 pens for compatibilty with AutoCAD; it's really too many. Pen 255 is black in case you put in a pen number greater than 255 by accident, which gives you pen 255. If this pen were a color, it would print in color, causing your plots to have gray lines.