
Location: 06 Wood & Plastic/Trim & Moulding
This has been deployed for some time, but here's the 'documentation'. It may or may not tell you something you don't know. I have also fixed a couple of minor glitches and finished the custom interface page, finally.
The Crown Tool is the the main moulding object. It doesn't do baseboards or rakes, but it does just about everything else. Use it for all crown moulding applications, and for cases where you need a piece of moulding, regardless of location. Other trim objects will be more specialized.
You'll use it a lot. Vassos has 200 Crown Tool objects, and we're just starting the interiors. Stevens ended up with about 325.
Brief Feature Summary Moulding profile, object shape, mitering and returns with graphical editing, backer moulding at wall and ceiling, half-round bead and wall backer 'cap', scale sensitive profiles and fills.
Here's a shot of the custom interface panel. Some of the options in the 'shape' area will change depending which shape is chosen.
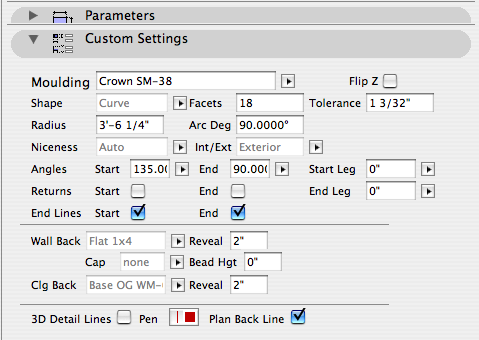
Moulding Selectable from a list of commonly used shapes from the Smoot book. I can add new shapes as you need them. Custom shapes are feasible. I have a decent moulding-creation scheme that isn't automatic but isn't a killer either. Ask.

Moulding profiles
Shape Straight, Coffer, Curve, L, U. Each shape can be either Interior or Exterior. You can combine the shapes to build just about anything.

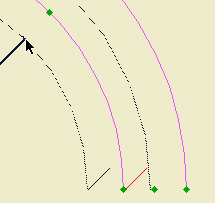
Shapes in plan
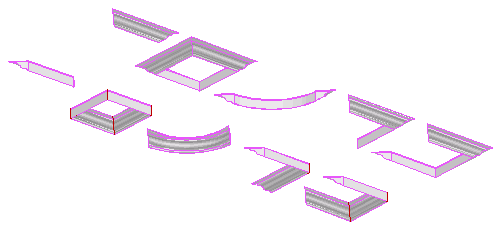
The crown armada
The coffer shape gives the option of building a 'ceiling' above the moulding itself. The other shapes don't.
The curve shape can have straight 'legs' at the start and/or end. These legs are graphically editable, see below. The resolution of the curve can be controlled directly with the 'Facets' parameter, or you can set a tolerance (how far off the curve can the segments get).
The entire object can turned upside down with the 'Flip Z' checkbox.
Niceness There are four levels of quality, plus an 'Auto' setting. Typically, you can leave the niceness set to 'Auto', and let the scale control the quality.
Miters and Returns Either end of any shape (except the coffer, of course) can be set to any miter angle. These angles are editable in plan. You can also have returns. You can turn on the return graphically by stretching the angle past 180.
Wall & Ceiling Backer Mouldings You can have a backer moulding at the wall and/or ceiling. The mouldings can be flat or any of several baseboard shapes.
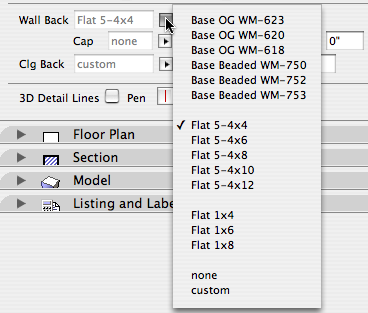
Wall backers. Ceiling options are similar.
If a wall backer is present, you have the option of building a half-round bead a distance down from the crown itself, and the option of building a 'cap' beneath the wall backer.
Scale Sensitivity With the the 'niceness' parameter set to 'Auto', the resolution of the profile will adjust itself depending on the scale of the window. (The objects will update with a rebuild.)
At building section scales (1/4", 1/2"), the back of the crown will is 'filled in' so the crown, wall, and ceiling should clean up. (Use 'Empty Fill')
At wall section scales (3/4")and larger, the crown pieces will be shown in section with true profiles, and wood fills. These section fills can be changed in the object's parameter list under the 'Detail Fills' heading. I left them out of the custom interface panel. They take up space, and you shouldn't need to change them often.
Section at large and small scales
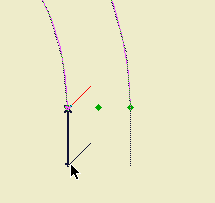
Plan Display and Editing The 2D view of the crown shows the overall width of the object with the miters and returns. If there is a ceiling backer, there will be an additional line at the edge of the crown itself.
Consistent with my personal standard, the 'start' end of the object is identifiable by its short red line.
(Use the layer F Trim Crown to display crown objects in RCP.)
The back line of the 2D symbol (against the wall) can be turned off. I honestly don't remember why I did this, but it doesn't hurt anything.
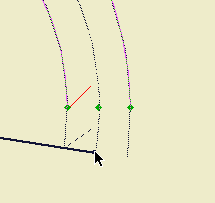
There are hotspots at each corner and at the midpoint of each leg. The front edge of the object is detectable. This should make selecting a particular object much easier.
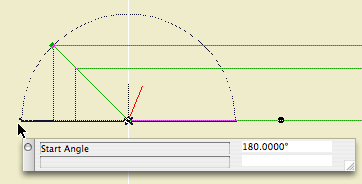
As described above, the miters and returns are editable in plan. The curve shape has some unique editing features.
The outside node at each end edits the miter angle.
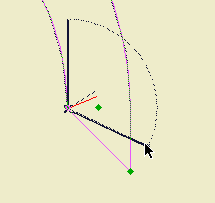
The inside node at each end edits the optional leg length.
The middle node at each end edits the curve arc degrees.
The node at the midpoint of the arc, on the wall side, edits the radius.
Usage Tips
• Use the L and U shapes as much as you can. They save a lot of time. Use L in corners, and U to go around fireplaces or into a niche.
• Place crowns using the stretchy or rotated stretchy geometry methods. This enables you to draw a crown like a line. Coffers, especially, should be placed stretchy.
• Mirror mouldings across corners.
• A 45 degree bay will have miters of 67.5 and 112.5 degrees. A 30 degree bay will have miters of 60 and 120 degrees. When editing miters, remember the N keyboard shortcut, which enables you to input values directly.