On Land

Environment Information
At Rill Architects we run ArchiCAD on macOS. If you work at Rill, this is your stuff. If you don't, but you work in ArchiCAD, you may find something interesting. Anybody else, I don't know.
RSS
February 2007 Archive

All Entries | 1 | 2

Moulding settings
Location: 06 Wood & Plastic / Trim & Moulding

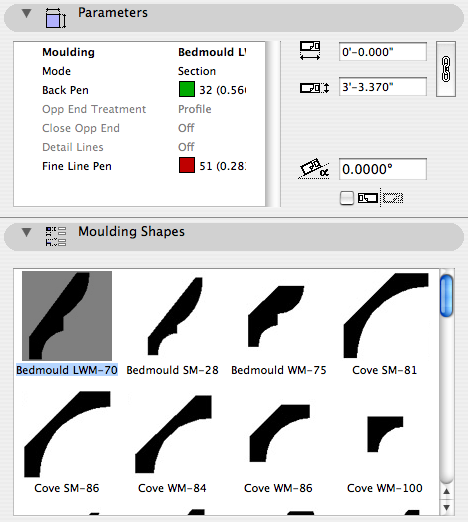
2D Moulding JAM9 is the current standard 2D moulding object. It is part of the whole moulding profile scheme, where I can add a new shape in one place and offer it for use in as many objects as we want. The Crown Tool, baseboard, rake, shed crown, door and window trim, etc., etc., are all hooked together. The 2D object offers all the shapes of all types.

I notice that a lot of people still use the individual shape objects in 06 Wood & Plastic / 2D Smoot. This doesn't hurt anything, but be advised that I don't use them and I don't maintain them, i.e., I don't make new ones. I can think of several reasons to use the old ones though:

• Habit.

• There's a shape in there that you can't find in 2D Moulding JAM9.

• You like seeing the shapes in the object browser.

The first one, you're on your own. The other two I believe I've covered with this revision.

I've gone through the old folder and incorporated all the shapes into 2D Moulding JAM9. I think. You'll let me know of course, just like you would if you needed a shape for the first time.

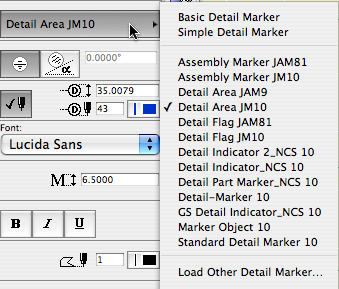
I made a graphical browser for the shapes.

I also reordered the list a bit. This is just a very cumbersome list. The current scheme is groups of:

• Crowns (including cove, rake, and bedmould)

• Casing (including fluting)

• Base (including cap and shoe)

• Panelmould (including nosing)

I hope it makes your shape choosing all that it should be.

Sheet A1-4
• What Shows.

Roofs on the A Roof2 layers. Gutters (on F Gutter). Top elements of chimneys on A Fireplace or A Roof2. Notes on +A Arch Note Reg Scale. +A Misc Line. The roof plan uses the same layer combination for output as the rest of the plans, A1 Floor+Roof Plan.

Roof elements will be placed on the lowest story on which they should be visible, and they need to show enough stories above to be visible on the roof story. For some roofs this means 'one story up', and for some it means 'all stories above' (custom setting). Much more on roofs in plan here.

• Annotations.

For the slope arrow, use a line with an arrowhead at one end. The arrow points down.

Note the roof materials, gutters, crickets, etc.

# Strange Maps...

Generic Map

...is about just what it says. Check out this one of an imaginary generic territory. (Link. (Via Kottke)).

-James 2007-02-21-0756

Superseded by this.

Sheet A2-1
Everything I can think of about sections and elevations. Updated for AC10.

More»

Yard Ice

In Archicad 10, sections can automatically show story level markers and lines. They are feature-limited but I think they're worth using.

More»

Preview
Location: 01 General / 1 Graphic Symbols (The old one was in Drawing Tools.)

This is our 'stair helper'. As described here, I'm not a fan of all-in-one solutions for stairs or other complicated assemblies. I would rather build from discrete parts, each of which does its own job well. The main structure of a stair consists of slabs for landings and Stair Body objects for the flights. The railings and newels are separate.

The RiserMeter is one piece of the whole stair method complex. It performs several helpful tasks:

More»

Detail Markers List
It lumps together all the markers of a given type in the loaded libraries. It provides no hierarchy, no way to say, 'use this marker, not the AC library ones, not the obsolete versions of the right one.'

The browser interface of the object tool etc allows the library person (me) to gracefully deprecate old objects, and steer users toward the good ones.

When we update an object, we move the old one to the xOld R&D folder. This folder loads, so placed instances of old objects will continue to work. The updated one is the only one visible in the proper folder, so there's no question about which one is right. There's a Center Line symbol, it's in Graphic Symbols, and that's it.

Can't do it with markers. The marker chooser makes things more confusing than they need to be. For example, on the detail marker list, three out of thirteen items are meant to be used.

Prettier version from AC20 here.

Attic dormers have long been a black art in AC modeling. The 3D cleanup improvements in AC10 make their behavior much more predictable. In order to see these improvements, make sure this box is checked in Preferences -> Construction Elements:

Enhanced Cleanup

I can't say I've observed a performance hit in using this. No matter, it needs to be on.

More»

seaice.png

The new one is better.

arches
(A door.) Location: 04 Masonry

Make it Flat or not. If it's arched, you can set either the Spring Height or the Arch Height, and the other dimension will change to maintain the overall height.

You can show Joint Lines representing the stones, and set a Stone Max Width. The lines use the Joint Pen. (The lines on the old arch broke in AC10.)

Turn the keystone off by setting the Keystone Height to zero. The Key Base Width controls the width of the keystone. (At this time, the flat arch can't have a keystone.)

arches
Jambs of two arches
Plan: The nice thing about this arch is that it can show a proper jamb in plan, using the Plan Veneer Thickness. You can set the Fill and the Separator Pen (for the line between the jamb fill and the wall proper). The background color of the fill comes from the wall.

The overhead lines (Cased Op Lines) can be switched off individually.

Mitered Cabs
Two mitered blobs
Location: 12 Furnishings / Casework

Despite the version number, a minor update to the Cab Blob. Now you can miter it. No, they don't do that in real life; it's a 'blob' remember.

Also, almost unintentionally, this is the first 'important' object I'm no longer maintaining in AC9. There will be more of this going forward as 9 finally goes under for the last time.

Automatic titles are not new to 10, but title objects are new, and now that they are objects, we can use them, which is new.

A drawing title is essentially a marker for a drawing element. Like section markers, detail markers, symbol labels, and door/window markers, you choose the title from a popup menu rather than from an object-type browser.

Drawing title list

As with all markers, there's no way to restrict the list. It shows all the loaded drawing titles, and it's up to you to pick the right one.

Elevations, sections, site plans, and details should all use automatic titles. Plans are the only drawing which has an object (Plan Title RND10) in the window. PDFs placed for notes ordinarily shouldn't have a title. Scanned details might, it depends.

Since the title and its settings are part of the drawing element's settings, you can change them in groups using the Drawing Manager. (Note: You must have a layout as the frontmost window to do this; otherwise the title tab is grayed out.)

Drawing Title RND10a is very similar to Drawing Title RND9a. There's a couple of 10-specific changes:

• By default, the title uses the name of the drawing (which should come from the name of the view, which should come from the name of the window). You can put in a custom text under the 'Title' tab in the drawing settings dialog.

• Titles don't have a length parameter like a regular object. So the Length parameter controls the length. You would normally adjust this graphically:

Title stretch

The length still has a minimum equal to the title text length.

Again I have to apologize for issuing a '10a' revision. There was one issue with Drawing Title RND10 that I couldn't fix in place. That title would appear right on the corner by default. The new one appears 3/8" below the corner, which makes it easier to move the title as needed. Note the 'move marker' palette button:

Drawing drag

And, full disclosure, I broke the minimum length thing, but now that's fixed.

UPDATE 2007-12-11:

• You can set the Orientation of the title. You can have the title rotate to align with the Drawing (default), the Layout, or a Custom Angle. Use the Layout option to keep the title horizontal when you rotate a drawing. This is optional, and it's not always right. For example, if you rotate a wall section to fit on the sheet, the title should rotate too. I can't think of a purpose for Custom Angle, but it wasn't hard to put in there. If you do ever use it, the angle is graphically editable.

• You can choose a manual scale from a list. Leave the field empty to use the drawing's true scale. This is usually correct. To show no scale text, choose 'blank' from the list. You need to set a manual scale for a scanned detail PDF; now you can choose it from a list.

(Heavily revised for AC10, though still a little clunky.) This is the standard workflow for issuing SK drawings.

More»

Location: 01 General / 5 Title & Layout

SK Hints

Very, very simple. A text showing a standard scale, which you can choose from a list. The primary use will be placement in the SK layouts' scale field.

Why? I don't like typing scales. And no, it's not easy to get the scale of the placed drawing automatically, though it should be.

Use it for SK addenda.

The templates have a fax transmittal as part of the layout book.

More»

lenadelta.png

We have had a handful of cases where Archicad autosave recovery has failed when it should have succeeded. We have also had cases of human error where the autosave never had a chance.

Since Archicad deletes the autosave data once it decides (right or wrong) that it's not needed, you don't get a second chance.

Unless you routinely back up the autosave folders.

More»

Date Formats
Options
Location: 01 General / 1 Graphic Symbols

A text object for writing the date.

If Auto Update is on, the date will be read from the system. (Tip: turn it on and then off to get today's date while keeping it from updating by itself tomorrow.) The Year, Month, and Day can be set manually using the pulldowns.

There are a lot of Date Format options. I've tried to cover all the conventions that I know of.

Any of the formats with a separator character will use the character given in Date Separator. You can choose from the list or make something up.

Two-Digit Day will zero-pad single digit days.

Day of Week can be on or off. If it's on, it will be read automatically along with the rest of the Auto Update. It will not fix itself for a manually set date. (It doesn't know the 30th is a Tuesday.) The Format of the day of the week can be long or short. Note that the list will always give the short form. The day of the week can be followed by an arbitrary separator, where the default is a comma.

You can add Leading or Trailing Text.

Text Formatting: All the usual suspects. Font, size. (You can choose mm or points to define the units.) Bold, italic, underline. The object can be anchored by any of the nine typical text block spots, using the Horizontal and Vertical Anchor parameters. You can have a Background Pen and the Outline Pen. Setting either one to zero turns it off. Finally, you can set the Padding between the text and the background/outline polygon. (This uses the same units option as the text size.)

Non-locals who would like to try it out can download it here.

Did you know? Cmd+` (the key above tab) switches windows within the current application. Pairs nicely with Cmd+tab for switching apps.

All Entries | 1 | 2