
This is a simple method for calculating gross floor area of a project, using the element schedule feature of AC10. It also gives us an introduction to basic element schedule technique.
The method assumes a tolerance for approximation; you need something to say when they ask, how big is it. If you need precision, you can figure it out I'm sure.
This schedule is provided in the templates, and it can be imported from 3 Resources/AC/Element Schedules. Or you could build it from scratch quite easily.
Place Fills. There's a layer, Z Gross Area, for the fills. There's a layer combination, x Gross Area, which shows this layer and the exterior walls only.
(When you show only the exterior walls, you'll probably find some walls that are mis-layered. If you see interior walls, you can move them to A Wall Int, which is unlocked but hidden in this combination. If there are exterior walls 'missing', You'll need to switch combinations and hunt them down.)
If there are gaps in the walls where the fireplaces should be, you can turn the A Fireplace layer on. (Here's an example of imprecision. Should fireplaces be included? Don't know.)
If the building perimeter is entirely enclosed by the walls, you can magic wand the fill. If there are gaps for whatever reason, you need to trace. You will usually end up with a combination of magic-wanding and tracing. Tip: It doesn't hurt to try a magic wand. You might get part of the shape, which you can then fill in (pet-palette add) with a combination of tracing and more magic-wanding.
What fill? It doesn't really matter; something you can see. I use one of the grids.
If the plan is in several pieces, you can use several fills. The calculation can accommodate this.
Place fills on all the stories. (For this illustration I have two fills on the second floor and one on the first.)
The Gross Area Element Schedule. Document menu -> Schedules and Lists -> Schedules -> Gross Area. Something like this:
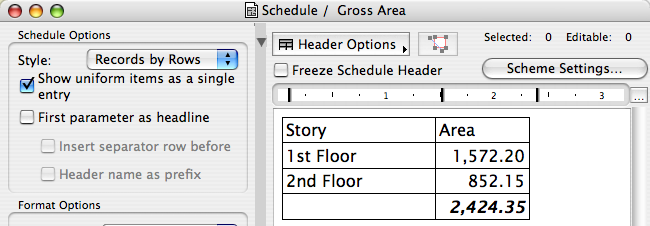
It's just the total on each story, and a grand total. Not much to it.
Note the 'Uniform Items' checkbox. This makes multiple fills on one story show up as a subtotal on one row.
Now let's look at the scheme to see how the schedule is built. Click that Scheme Settings button.
The Element Schedule Scheme.
Element Schedule Schemes are virtually identical in concept to Drawing Indexes. A schedule is built on criteria (Which items to list) and fields (what to list about those items).
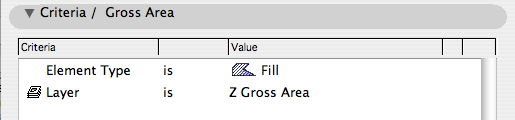
For the gross area schedule, we want just fills, just on that Z Gross Area layer:
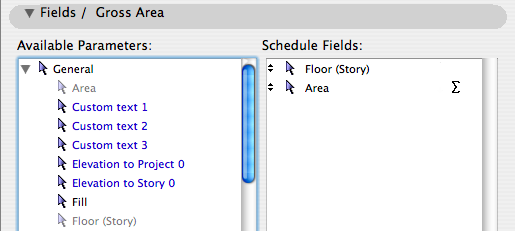
For the fields, we want the story and the area. Both of these fields are under the 'General' heading:
There are several sorting and totaling options for fields, which I'll point out in passing:
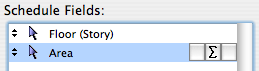
The first field button controls sorting. You can sort ascending, descending (alphabetically), or not sort, which will list the rows in their 'natural' order. For stories that's bottom to top.
The sigma (second button) creates a total based on that field. In this schedule the area needs that on. 'Sigma-prime' gives a total of the number of elements; rather than telling you the area of the fills, it would tell you how many fills there are.
The flag (third button) creates a subtotal (of the sigma-field) based on the flagged field. If you had multiple fills on any story, you could flag the Story field to get the subtotal. This is independent of the 'Uniform Items' checkbox. Only one field can be flagged at a time.
For all of these settings, including the Uniform Items checkbox, you are encouraged to flip them on and off to see what happens. (Documentation in this area was very incomplete in AC10; in the 11 Reference Guide it's much better.)