
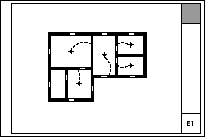
The RCP shows everything on the ceiling, whether electrical or not. This includes trim, ceiling finishes, and HVAC registers. The electrical plan shows everything electrical, whether on the ceiling or not.
The plans should be separate if combining all that stuff would make a confusing drawing. If the combined drawing would not be too much of a mess, the two drawings can be unified as the RCP and the electrical plan can be discarded.
Our principals have the habit of red-lining electrical work on the RCP either way. Don't let this distract you from the right decision about using separate plans, or not.
It so happens that we have a lot of electrical layers. They are all needed. I will list them here, but if you want the full story of their proliferation you have to go elsewhere.
E Fixt2: Wall & floor fixtures, switches, receptacles; 2D symbol only. Shows in Electrical Plan only, not model or RCP.
E Fixt3: Wall & floor fixtures, switches, receptacles; modeled, display with symbols. Shows in Electrical Plan, A5 Interior Elevations, and 3D Views, but not RCP. Interior wall fixtures which you want to see in interior elevations go here.
E Fixt Clg2: Ceiling fixtures, 2D symbol only. Shows in Electrical Plan and Reflected Ceiling Plan, not model.
E Fixt Clg3: Ceiling fixtures, modeled, displayed with symbols. Shows in Electrical Plan, Reflected Ceiling Plan, A5 Interior Elevations, View Interior.
E Fixt Ext3: Exterior wall fixtures, modeled, displayed with symbols. Shows in 1/4" Elevations, Electrical plan. This would be the fancy sconce by the front door that you want to see in elevation.
E Fixt Ext Clg3: Exterior ceiling fixtures, modeled, display with symbols. Shows in 1/4" Elevations, Electrical plan, Reflected Ceiling Plan. This would be the fancy pendant light in the portico ceiling that you want to see in elevation.
If it's just a symbol, use E Fixt Clg2 for ceiling fixtures and E Fixt2 for everything else. If it's a model of a fixture but it displays an electrical symbol, use E Fixt3 for wall fixtures and E Fixt Clg3 for ceiling fixtures. If those modeled fixtures are exterior, use the corresponding exterior layers.
If you are using a modeled fixture that doesn't show a proper symbol in plan, put the fixture on an F Trim layer and use a separate symbol for the electrical plan.
Why are some symbols lamps and some objects? The lamp tool has mixed purposes in AC. From the standpoint of generic modeling and rendering, an Archicad lamp is a 'light', a source of illumination for other elements and scenes. A light in this sense might not have any 3D polygons of its own, it just affects the environment around it. The General Light, Window Light, and Sky Object are examples of this kind of lamp in the AC library.
But, since AC is explicitly architectural and many of the tools have an architectural slant, a lamp can also be considered an object of a special type, a light fixture. Similarly, windows and doors are special objects in that they can cut a hole in a wall. In theory, you could ignore the window tool and make all your windows out of door objects. The walls would still be cut, but it would be confusing. Since the toolbox offers both tools, it's clearer to use both for what they are. It's the same with lamps. Since the tool is there, light fixtures should use the light fixture tool.
However, look: That's the only reason our lighting symbols and fixture objects are lamps. None of them emit light. Would it be better, and more pure Virtual Building, if they did? Maybe, but the light-rendering abilities of AC are still rather weak, and in order to light a scene 'realistically', you need fake lights. Meanwhile, the architectural lamps are really just objects, though we make them with the lamp tool because we can.
So any electrical object that would emit light in reality is a lamp. Recessed, surface, sconce; whether symbol or model. Everything else is an object: Switches, fans, outlets, etc.
It's easy to get confused and think the lighting symbols are 'missing' when trying to access them via the object tool settings. Fortunately, the Electrical Symbols module has all the lamps and objects in one place, so it's easy to option-click on whatever to place it in the plan.
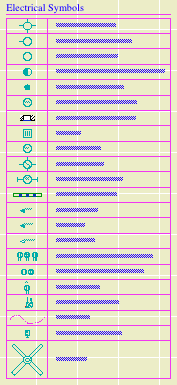
Update: This symbols method is still available in the templates, but you should consider using an electrical symbol schedule instead.
The electrical symbols table is a hotlinked module placed on the Footings story. The linked file is 3 Resources / AC / External References / Elec Symbols11.PLN. (Message to the future: Maybe by now the file is called 12.pln or even 13. Use the newest one until I edit this paragraph.)
In the templates, there is a saved view of the symbols table called 'Electrical Symbols', located in the Note & Title folder. This view is placed as a drawing on each electrical plan layout. One view, several drawings.
In addition to providing the symbol table for output, the hotlinked symbols can be used to build up the electrical plans. Set your trace reference (FKA ghost) to the Footings story (as opposed to Previous or Above or Below). Then you can option-click on the symbols from any story to set the object and lamp tools to do what you need to do. The a-doorbell term for this remote dropper move is 'ice-fishing'.
If you need/want to modify the symbols table, simply break the link using Hotlink Manager.
For switches, use the object SwitchMulti JAM81. Use a spline for the switch paths, with the Dot & Dashed line type. There's a favorite set for this purpose.