
The finish schedule is an element schedule of zones. You need to read that link if you haven't already.
Zones know certain things about themselves, such as their height, perimeter, area, and many other measurements. Area is automatic if you fit the zone to its enclosing walls, but the height has to be set. Volume measurement is automatic, but zones must be trimmed to get an accurate volume.
In our finish schedule, some of the data is this kind of 'tell me about yourself' information, including the room name and number, story, and area.
The rest of the fields contain arbitrary information about the finishes and other specifications. This info is in custom parameters, created by us, within our standard zone stamp object, Room Name Stamp JM11. So the stamp a container for data about the room, as well as the graphic symbol of the room. Examples of these fields: Crown type, base type, ceiling finish, allowances, remarks.
At this point I need to make clear something non-intiutive and kinda disappointing.
The room is real, so to speak. It has walls, doors and windows, a ceiling, a floor. We put a zone in the room and the zone is real. The zone knows certain things about the real room, such as its area. The room has baseboard (in the form of objects) in it, which is real. The zone stamp object has a parameter for 'baseboard type', but it's not connected to the baseboard objects in the room. This obviously violates the unity principle and is not ideal. But, unfortunately, there is no way for a zone to know parameters of an element placed within it.
So the 'baseboard type' field is just a field; it's text. It's present in the zone stamp solely to show info in the finish schedule. The real baseboard objects in the room are for showing info in the drawings. Ideally, both kinds of info would come from one element; that's unity. But it doesn't work that way at this time. If you change the real baseboard, you have to change the zone/schedule baseboard, and vice versa. The upside is you can describe all the finishes before they actually modeled, if they ever are.
This means a lot of the finish schedule is still being done manually. The advantage of doing this with zones is it keeps the info in the project file rather than in a separate spreadsheet. It's not automatic, but it's still better organized.
To review, schedules are set up in Scheme Settings. (Document -> Schedules and Lists -> Schedules -> Scheme Settings) The individual schedules can be opened by selecting them from that same Schedules menu, or via the project map. You can also get the settings from within the schedule window by clicking the Scheme Settings button.
An element schedule is almost exactly the same as a project index. Scheme settings can be exported and imported, and the current schemes are always located at 3 Resources / AC / Element Schedules.
The Criteria section controls what elements will be shown. In this case, zones on the +Z Zones.N layer:

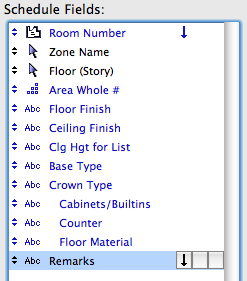
The Fields section controls what about those things will be shown:

Regardless of what sort of elements are being listed, the General heading contains universal properties such as ID, area, story, and elevation. Our schedule uses 'Zone Name' and 'Floor (story)' from this heading. (But not 'Area'; more in a minute.)
Then there's a tool-specific group of properties. Under the 'Zone' heading, we're using the 'Zone Number' item. (I don't know why 'Zone Name' is a General item.)
All of these fields are available for all zones, regardless of the specific zone stamp object in use. The rest of the fields are generated within the Room Name Stamp JM11 zone stamp.
The default Finish Schedule scheme has many standard fields set up, but this is as good a time as any to show you how those parameters get in the schedule, in case our requirements change or you delete a field by accident.
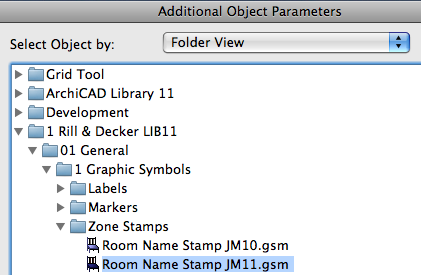
When you click 'Additional Parameters', you get a dialog box where you can navigate through the loaded libraries to the object that has the parameters you want to list. In this case it's the zone stamp.
At the bottom of that dialog are two boxes. On the left is all the parameters available in the object. On the right are the parameters that have already been selected for use. Parameters in use are gray in the left side box.
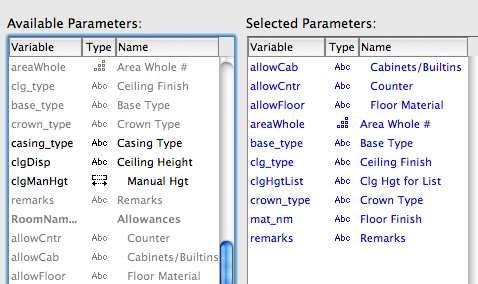
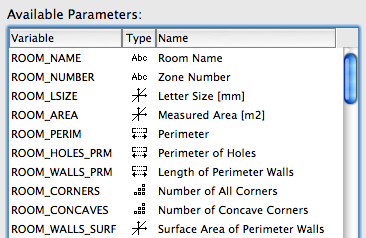
At the top of the parameter list are a whole lot of parameter names beginning with 'ROOM_'. These will give automatically generated quantities associated with the zone.
To add a parameter to the schedule, drag it from left to right or highlight on the left and click 'Add'. When you OK that dialog, you're back in the Scheme Settings, where the new parameter will appear at the bottom of the list. Click that down-pointing arrow until it disappears; that controls sorting the list by that parameter, and only the room number has that power.
Any listing parameter can be taken out of the schedule by simply removing it from the list.
To view the index, select it from that Document -> Project Indexes menu, or double-click it in the project map or view map (once you save a view of it).
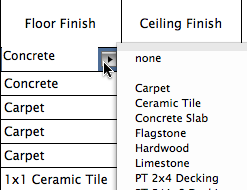
When you view the schedule, you can edit many of the fields right there. For example, you can check for and fix duplicates in the room numbers. Rebuild the schedule to re-sort it. For any parameter that offers you a list of options, you can even see the same list within the schedule:
Though, for some reason, you can't edit the name of the room itself.
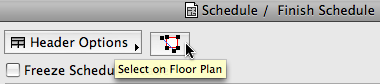
You can also select schedule items in the floor plan with this button:
If a room's crown or base detail is a one-piece moulding, you can put the shape's name directly in the type field. If it's a multi-part assembly, you should create a detail of that assembly and refer to it by type number.
There is a parameter for Casing Type too, but I left it out of the default schedule. If only one kind of casing is used, you don't need a item in the finish schedule itself, you can put it in a note or in the specs. If you have multiple types, add that parameter as described above.
You can provide the square footage of rooms to help out whoever is pricing the project. Or you can leave it out and make them use a scale. If you do provide the area, it obviously has to be accurate. Make sure the zones are updated. Make sure you have zone boundary lines dividing large spaces as needed. If the kitchen zone is reporting that it's 3/4 of the first floor area, you have a problem. It helps to show the zone category color (in model view options).
Instead of using any of the automatic area parameters, we use a custom parameter which gives the area in whole square feet. You can force all area values to display zero decimals with the calculation units preferences, but I don't like having to remember where that is.
In our projects, there is usually a typical ceiling height for each story, while some rooms have different heights, usually lower. In the model, we would add a slab element to the top of the room on the A Ceiling3 layer. In the finish schedule, there is a field where you can show the ceiling height when it varies.
Zones have a 3D height value, but it is not automatically generated from the ceiling height of a room. Further, if a zone is trimmed, that reduction will not automatically be reflected in the height. This means that displaying the zone height value directly is often impractical and could be misleading.
I went back and forth on this before deciding to just offer every option I could think of. In the settings of the zone, there is a parameter called Ceiling Height. This is not a dimension but a list of options. The 'Typ' option writes 'Typ' in the schedule field. 'Zone Height' gives the actual height of the zone; only use it if you're sure the zone is correct. 'Enter Manually' reveals another parameter below, Manual Hgt, where you can put in a dimension. There is also a 'Custom' option, which means you can type anything you want.
However you choose to handle the height, it gets processed and put into yet another parameter, Clg Hgt For List, under 'Listing' in the zone settings. It is this parameter that shows in the schedule. This is the only way we can show a dimension, or a word, or a blank in one field.
This is all pretty inelegant, and I'm sorry. For mental health, I recommend using 'Manual Height' for special rooms, and leaving the field blank for typical rooms. Important: If you were using the zones for volume or surface calculations, the heights would need to be correct.
Because the finish fields are just fields, unconnected to anything real, it's trivial to add more if there are other data types you want to include. Wainscot type? Picture rail? Floor tile name? If you want to rate your rooms like iTunes tracks, we can do it.
In this way, the set of zones is like database, with each room as one record. Adding fields is no big deal.
A schedule is a viewpoint, like a section, elevation, or detail. Take a look at the project map. Element schedules are within the Schedules division. The window and door schedules are in the same place.
You can save views of schedules, like you can with any viewpoint. I think creating a view is not as important where schedules are concerned, because they don't have scale, model view options, or dimensions. Elements will appear in a schedule even if their layer is hidden. So you can create a view if you want to, or you just use the project map item. Either way, simply drag the schedule from the project/view map to a layout; it becomes a drawing. The drawing should not have a title.