
Zones are information elements. They represent rooms and other definable areas and volumes in the project. You don't need them to build a good model, and you don't need them to create good drawings. They make the project smarter by letting you treat a space as a thing, so you can keep track of information associated with rooms as opposed to their enclosing elements.
Zones' responsibilities can include:
• Displaying the room name and number in the plan
• Reporting room dimensions such as area and volume
• Holding on to descriptive data for use in a room finish schedule
• Automatically naming interior elevations
• Giving locations for a fixture schedule
Zones behave like polygons with a couple of exceptions. The polygon editing palette is the same. The construction methods are different:
The first method is a polygon, though the button doesn't look like the typical pac-man. There is no rectangle or rotated rectangle method.
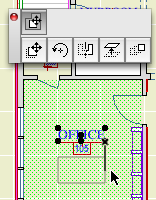
Since zones often represent rooms, it is not surprising that they have a special relationship with walls. The second construction method makes a zone that automatically fits enclosing walls. This is like the magic wand, but you don't use the spacebar; just click in the room. A zone created in this way knows it is associated with a room, and, if the wall geometry changes, the zone can be updated to fit it again. The polygon is not associated with anything and can't be updated, though of course it can be edited like any polygon. More on updating below.
The third button is similar, but it fits zones to reference lines instead of edges. We don't use this one at this time.
Use a polygon zone for a space without walls, such as a porch. Slab edges can't be zone boundaries.
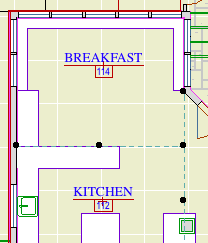
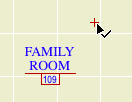
Zones have a special object associated with them called a Zone Stamp. These objects can be designed to display the room name, number, and other info; to do calculations about the zone; and to hold descriptive data about the zone for use in schedules. Stamps can be moved with the cursor:
In Archicad 11, our standard zone stamp is Room Name Stamp JM11.
Name and number are set at the top of the info box or settings dialog. In our standard zone stamp, you can choose the name from a list or customize it.
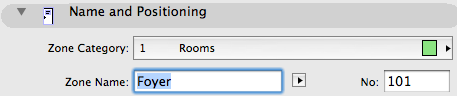
Our room number format is '000', where the first digit is the story and the other digits are the room. The number increments as zones are placed, but the numbers need not be unique, so you must check for duplicates yourself. Do this using a schedule. Zones also have an ordinary ID field, like any model element, but we ignore it.
Zones don't have the typical top and bottom (t and b) fields in the info box. Instead they have 'Level' and 'Height'. The level refers to the story, not to project zero. Most zones will have a level of zero relative to their stories.
Height is not automatic in any way; the zone can't find the ceiling by itself. You have to put the height in manually.
Zones are 2D and 3D elements. Obviously the height is a 3D property. Depending on how you're using the zones, setting the height might not be a top priority. You can use the 2D and scheduling abilities of the zone while ignoring the height, volume, and other 3D properties.
Height can be zero, and this would be right for a zone with no ceiling, such as a terrace.
Zones can be trimmed to elements above or below them, using the Trim Zones command on the Edit menu. This trimming does not affect the height value. If you were using the zones for any volume or surface calculations, you would want to make sure the height and trimming is correct.
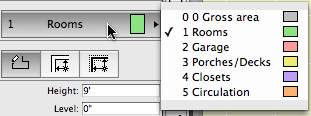
Zones can be assigned to user-defined categories to organize them. We have categories for Rooms, Porches/Decks, Garages, Closets, and Circulation. Each category has a color. You will see this color in plan if if the category is set to show in Model View Options. It's helpful to see the colors to check if zones need updating. We would never display the colors for output.
The zone stamp is assigned to the category, instead of to the individual zones. All zones of a given category will display the same stamp. In our usage, we only have one stamp and all the categories use it. Zone categories are attributes and are stored with the project (like fills, materials, etc), and can be modified at Options -> Attributes -> Zone Categories.
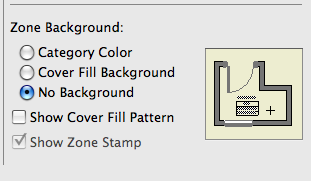
If the background is on, the stamp can be hidden by unchecking the box. If the background is off, the stamp is forced on and the box is grayed out.
In practice, we ignore the stamp MVO checkbox and handle zone stamp display as a layer issue. The background is always off unless you turn it on. I.e., it's off in all MVO combinations.
As walls and other zone boundaries move around, the zones do not automatically update. There are updated using the 'Update Zones' palette on the Design menu. Select the zones and click 'Update selected zones'. You can do 'Select All'; there is no harm in updating a zone that hasn't actually changed. When you update, the Update Zones box shows the percentage change in the size of the zone.
Make sure your zones are current before doing any listing of them. Don't give people inaccurate area figures.
Polygon zones, drawn with the first construction method, are not affected by updating.
Lots of people get along without them, but I use zones exclusively, and never a 'dumb' room name. They are the key to enriching the model's information, as opposed to its geometry. Place them early and update them often.