On Land

Environment Information
At Rill Architects we run ArchiCAD on macOS. If you work at Rill, this is your stuff. If you don't, but you work in ArchiCAD, you may find something interesting. Anybody else, I don't know.
RSS
Plotting Archive

All Entries | 1 | 2

The new large format printer has wider margins than the old one, leaving slightly less usable layout area.

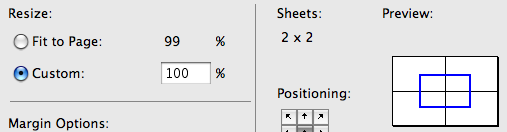
The available layout area is the paper size minus the margins. Our current masters, based on narrower margins, don't fit in the new, slightly smaller layout area. When you go to print, you will see the Print dialog trying to put the layout onto four sheets, and offering to shrink the layout to make it fit. Neither is a good idea.

Four sheets

This is easy to fix.

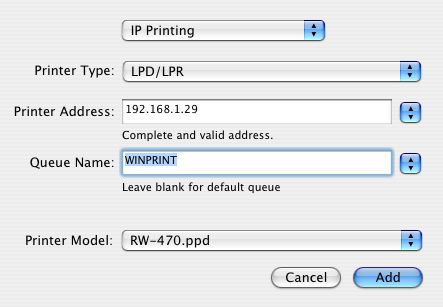
First, get the margins from the printer. For each master in use, highlight it in the layout tree and click Settings. At the Size control, select "Import Settings From Printer".

Import from printer

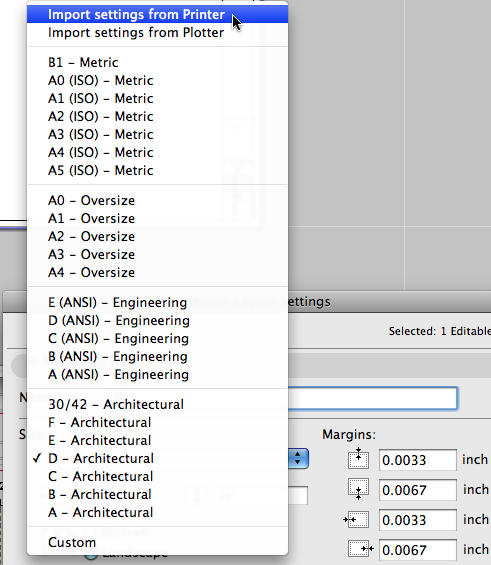
You will then get a Page Setup dialog box. Select the 192.168.1.214 item and then the appropriate paper size. (These are: C - 18x24in. D - 24x36in. E - 30x42in.)

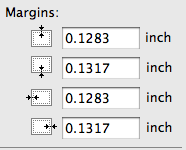
OK that dialog box. If you look fast you can see the margin values change from less than a hundredth of an inch to more than a tenth:

New margins

Second, for each detail master you have to change the grid. In the master's settings again, click Grid Setup. Change the four values under "Distance From Margin" to be 1/8" less:

New margins

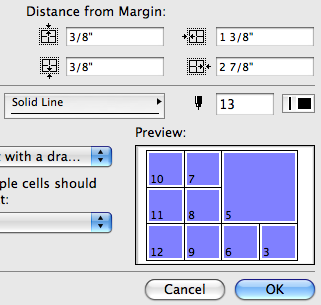
This change makes no difference in the printed output, since the new margin still lies outside the graphical frame of the sheet.

(Formalization of this.)

If you have a job too large to print in house, email PDF files here.

The files size limit is about 50MB.

Put the job details in the message, including the number of sets, delivery time, and any special instructions.

MBC advises us that you should call them to make sure the job got there and that they are aware of it, especially if the job is a rush, or if you are sending it outside of normal business hours.

(Similar to: In-House Printing (PlotMaker 9))

For large format output we use that enormous, hot, 16-amp-pulling thing in the middle of the office.

(Note: This is about printing layouts. 'Check printing' from AC, for the heck of it, is another matter.)

More»

This is how to install the large format printer. Installing other printers is similar in some respects.

More»

I'm happy to announce, and I hope I don't regret it, that we can email PDFs to MBC. And they will print them, and the drawings will probably be alright. I'm sure there will be some tuning up to do, but I think we have it working.

This is the address. Put the job details (copies etc) in the message. The file size limit is 50MB.

Let me know if you have any problems.

If you have ever tried to print a half-size set directly on the WINPRINT thing, you probably never tried again, because it took ten times longer than it should have. This is a limitation of the printer, but here's a pretty good workaround.

More»

Attention: The only reason to plot instead of print is to send drawings out, until the print shops learn to print our PDFs without mangling them. DO NOT PLOT for archiving, or for printing in-house. PLTs look pretty bad when printed here. This method is offered as an emergency backup for when we run out of paper, or to print more sets than we can comfortably collate & staple ourselves.

I look forward to informing you that this technique is no longer needed.

More»

Every drawing or set we give to someone else should be archived as a PDF in the project folder at 2 Output : PDF Archive. This is for convenience and our own protection.

Archives should be named with the date, and a description if the set is for a specific purpose, such as a permit set. Example: Somebody 2005-03-11 Permit.PDF.

In OS X, PDFs can be created from any print dialog by clicking the Save As PDF button.

PDFs saved in this way will be single files with all the printed sheets in them.

You can use PDFs to send drawings to consultants, if they just want to view the drawings and don't need CAD data. If they need actual drawing stuff, you need to send DWGs.

You can view drawing set PDFs using Adobe Reader or Preview, the OS X PDF viewer. Preview is generally better.

For large format output we use that enormous, hot, 16-amp-pulling thing in the middle of the office.

Here is how to install the plotter on your machine.

In PlotMaker, Page Setup. Go to File -> Page Setup. (Not Plot Setup!) At "Format For", select "WINPRINT 192.168.1.29". Select the Paper Size from the next pulldown. 18x24 is ARC C. 24x36 is ARC D. 30x42 is 30X42, not ARC E. (11x17 should be printed on the "small" printer.) To summarize, the only sizes we use are ARC C, ARC D, and 30x42.

In PlotMaker, Display Options. Make sure the fills are set to display "All Vectorial."

If you plan to print "Selected in Navigator", see below, highlight the layouts you want to print.

To print, issue the Print command by File -> Print, Cmd+P, or a toolbar button. Make sure the WINPRINT printer is selected. Set the number of copies. Click Copies & Pages and choose PlotMaker. Select what to print. Don't check "All Colors to Black."

All of the above can be automated by using Publisher, which is a really good idea.

When you print, the print job actually goes to the PC [insert snark] next to the plotter. Depending on the size of the job, it can take a while for the job to process. If you bring the PlotBase application forward, you should see your job at the bottom of the list. It will read Preparing Data, Pending, then Plotting. To reprint a job, right-click on and choose Status -> Pending. I know, real intuitive. The last 50 jobs are saved.

Plotbase troubleshooting: Make sure the "Play" button is pressed (gray). Make sure the "reader" is on (Configuration Menu).

Once the sheets start coming out, it's quick, seven D sheets a minute. Right now we don't have any facility for catching the sheets as they come out. You can grab them one at a time, or pick up the pile at the end. We'll keep working on it. Also not well-solved: binding.

Publisher is the best way to get output from PM. It allows you to save view sets with output settings, so you get the same result every time. I recommend it for printing and DWG creation.

Publisher is based on the view set concept, like in Archicad, except that in PM view sets are only used for publication and you won't encounter them otherwise. You should have a view set for each output you produce with any regularity.

More»

Don't forget to install the plotter.

Do the Archicad stuff first.

More»

Deprecated. Read this instead.

I think I need an Obsolete category.

More»

• Switch the title block to the RND9 version. Required. Use Cmd+Opt+click on the new object to retain settings. This is very important. If it fails, that is, you get the new object with default settings, cancel out of the settings box and try again. Delete all the hotspots. Place new hotspots in the sheet number box and the corners of the main drawing area.

• The grays as they come out of the new plotter are all darker. This affects the gray poche in the walls, etc. and the gray lines we use for floor and material fills.

The poche is a little dark, but we can live with it. If you change it it will look better, but it's a chore: You must change the fill background color of all 3D building elements (walls, roofs, slabs), and the background color of all the skins in composites whose settings are used in elements, and the fill color/background color of any masking fills, and the fill color/background color of any objects that show poche in plan or section, keeping in mind that some of them have special parameters for these fills. A chore. If you choose to go through with it, use pen 50. This is our new, dedicated poche pen. The idea is to make the next gray revision simpler; with a dedicated pen, we can just change the color of it rather than the settings of dozens of elements. I wish I'd thought of it sooner. So, poche pen change: Optional.

The fills, however, aren't quite OK. They should be changed to pen 150*. Strongly recommended. The fills include:

1. Fill elements, many of which will be on the F Floor Fin2 layer. Use find and select, on each story, for fills with pen 93.

2. Cover fills on 3D elements, including slabs, roofs, meshes. Do this in the 3D window to get all the stories at once.

3. Vectorial hatching pen on materials. You have to do each material separately in Options -> Attributes -> Materials. (Attribute Manager doesn't work for this.)

• In addition to the grays being darker, all the line weights are heavier, so we need to make all our pens slightly thinner. You will have to do this by hand in PlotMaker. In Archicad, you can use Attribute Manager to import the pens from 3 Resources : Attributes : Color Pens 0105. Required.

All the changes discussed above will be made in the templates.

*UPDATE: This used to say 92. 92 is the right color for plotted output, but in Archicad it looks too light on the screen. Read this post about the new material fill pen. As for changing the pen, either 92 or 150 will work in PM.

This is how to install our gigantic new plotter. Installing other printers is similar in some respects.

System Preferences, Print & Fax, Set Up Printers.

Click "Add".

At the top, select "IP Printing"

Printer Type: LPD/LPR

Printer Address: 192.168.1.29

Queue Name: WINPRINT (Case sensitive)

Printer Model: Other...

Navigate to 3 Resources : Printers : RW470 : RW-470.ppd

Choose.

Add.


If the settings look like this, click Add.

The new printer should appear as "WINPRINT on 192.168.1.29". This is also the name you will see in Page Setup. It will be the default, unless you want to make another printer the default. (If so, select it and click "Make Default".)

Don't forget to do page setup in PlotMaker:

Go to File -> Page Setup. (Not Plot Setup!) At "Format For", select "WINPRINT 192.168.1.29". Select the Paper Size from the next pulldown. 18x24 is ARC C. 24x36 is ARC D. 30x42 is 30X42, not ARC E.

If you don't see 30X42, make sure you got the ppd file from the RW470 folder, nowhere else.

No, that's not all there is to it.


The camera makes it look fat

We have a new plotter. Actually it's a printer. Everybody calls it a plotter, though. Soon we won't plot anymore, we'll just print, like everyone else, and then we'll call printing on big sheets plotting, like everyone else, and we'll call the big new output device a plotter.

(You think I'm being technical and pedantic, but one of the main sources of trouble in getting this thing in here has been that there IS a difference, and the people selling us the, ah, machine think there isn't. It's also the cause of the hard labor you will have to do on each project to get your output looking as good as it did before.)

So we have a good news/bad news/bad news/good news situation.

The good news is that it works.

The bad news is the hard labor of adjusting our workflow.

The other bad news is the plotter requires a "PC" in order to function. A PC is sort of like a computer except it breaks a lot.

The other good news is the output is insanely fast (7 pages a minute). And, since they're forcing us to print, we will gain several appealing advantages of printing over plotting, such as easier publication, sharing, and archiving. I.e., PDFs. And it scans large sheets, so we can electronically archive Jim's basement, including the hand-drawn stuff. Wild!

Here's a summary of the changes to our lives:

� Plotting is going away, including Plot Setup, PlotFlow, and the Plot command. We will print instead.

� We won't send drawings out as often. We can print a 35-page set in 5 minutes! Twenty 35-page sets, we'll still send that out.

� You have some work to do on current projects to get them looking good. This is a big change and it just isn't magic.

� We will archive using PDF instead of PLT files. We can scan old paper sets to archive them to PDF.

Thank you for your patience as we work out the remaining kinks.

By the way, up to this point I have been trying to get our plotting ability back on line, so I'm not an expert in scanning and copying yet, let alone changing the toner and whatnot. One thing at a time.

Several related posts:

Installation
New Title Block
Project Changes
Layout Book Changes

Send PLT files to the plotter using PlotFlow. Some day, we will be able to run it on the server. Currently, everyone has to run it locally.

More»

(Update, 2006-10-07) This process is mostly obsolete, but I haven't categorized it that way quite yet.

It applies to sending out PLTs (no longer used) using Reprodesk (don't need it anymore) on Virtual PC (good riddance).

The current method of service bureau printing is to email PDFs. But we still have PLT files as archives. While those could probably be emailed too, Reprodesk would probably be the better way if we could remember how.

More»

One or two check plots may be sent directly to the plotter. Any more than that takes forever, during which time you can't do anything else in PM. Usually, create PLT files. Always create PLTs when giving drawings to anyone else.

More»

So easy anyone can do it. Unless it doesn't work.

More»

Read this instead

All Entries | 1 | 2