On Land

Environment Information
At Rill Architects we run ArchiCAD on macOS. If you work at Rill, this is your stuff. If you don't, but you work in ArchiCAD, you may find something interesting. Anybody else, I don't know.
RSS
Tips Archive

The fastest way to cancel anything is to type Esc.

The fastest way to deselect is to type Esc.

The fastest way to remove marquee is to type Esc.

The fastest way to switch to the Arrow is to type Esc. The second fastest way is to type Right Arrow, and that's better a lot of the times because it doesn't require that you have no selection and no marquee.

The fastest way to activate the Marquee tool is to type ` (the key above Tab).

The fastest way to activate the Wall tool is to type 1.

The fastest way to activate the Slab tool is to type 2.

The fastest way to activate the Roof tool is to type 3.

The fastest way to activate the Text tool is to type E.

The fastest way to activate the Fill tool is to type F.

The fastest way to activate the Door or Window tool is to type D or W respectively.

The fastest way to change the reference line side of a wall is to type C.

The fastest way to change the geometry method (box, rotated box, polygon, etc) of any tool is to type G. It's also the fastest way to switch the orientation of the dimension tool.

The fastest way to turn on gravity and choose the gravity element type is to type V.

You can do all those things without moving your left arm. You have to move your left arm a little, but it's still fastest to

...activate the arc tool by typing 0 (zero),

...activate the Object tool by typing (letter) O,

...activate the line tool by typing L,

...activate the Dimension tool by typing /.

...toggle the rotated grid by typing K.

Plenty more where those came from.

I will try to flesh this out when I have time. It's a solid method, and touches on a lot of useful techniques.

• 3 coincident walls for fire box: Stone veneer, block core, fire brick. All go on A Fireplace.

• Use roof for back of fire box; SEO add to firebrick wall. Roof goes on X SEO General.

• SEO Subtract firebrick assembly from core. Subtract FB assembly and core from veneer.

• On top of firebox, 2 slabs or walls, one inside the other, veneer and core. Both go on A Chimney3. Subtract core from veneer.

• Smoke chamber: Mesh. connect firebox void to smoke chamber with slab. Both go on X Flue. Use print-white pens. Subtract both from the core Chimney3 element.

• Flue: Object, Flue JM9. Can be plumb or offset. Build the flue out of segments, attach to smoke chamber, work your way up. Some flues will show in plan, check the "Show Cut" box in settings.

• Subtract the flues from everything they pass through.

• Use slabs for hearths, adjust Chimney3 elements as needed. Fill in with Chimney3 walls or slabs as needed.

You can copy and paste elements between facing sections/elevations, and easily put the pasted elements in the right place. Examples: Room names in sections, and elevation outlines.

The trick is to mirror the elements across the global origin.

More»

Hotspots do two things:

1. Placing a detectable point where there isn't one.

2. Making a point detectable in PlotMaker, for the purpose of aligning drawings to one another or to the layout.

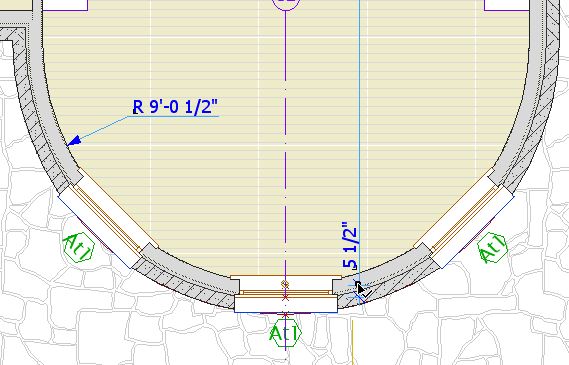
In practice, I use very few hotspots. I try only to use them where they will be permanent. A common example is a hotspot at the maximum of a curved wall, so the wall can be dimensioned.


Such permanent hotspots should be locked.

I almost never use them as a workaround, and if I do, I delete them immediately. If you get in the habit of placing a lot of hotspots and leaving them around, the workspace becomes cluttered with extra detectable points, making it harder to be sure you are detecting the point you want, leading to errors.

Further, hotspotting an arbitrary point to detect it is usually not needed. Special snap points and the ghost story make it possible to detect any point worth detecting, and you can move the origin to "transmit" a point through stories. You can also use CenterPoint JAM9 as a hotspot, and it has the added benefit of showing on multiple stories. And really, how often do you need to detect a point that's truly in the middle of nowhere?

If you've gone on a hotspot binge for whatever reason, you can delete them all at once: Activate the tool, Select All (Cmd+A), delete. Since your permanent hotspots are locked, the won't be harmed in the purge.

Hotspots are also created by certain variants of command clicking. This has occasional usefulness, but it more often happens by accident. Be aware of it so you don't wonder how you made a hotspot without the hotspot tool.

The hotspot on the wall is in line with the red line:


To place a spot like this, select the line, activate any tool except the line or arrow tools, and Cmd+click on the wall.

If the arrow tool was active, nothing would happen. (I think this is a bug.) If the line tool was active, the line would extend to the wall. (Cmd+click acts like adjust where the active tool matches the selected element.)

In most cases, I would just extend the line.

A truly, I think, useless feature crops up when you Cmd+click on a roof edge instead of a corner, when trying to find the height of a roof at a point. You get a hotspot at both corners bounding the clicked edge. And you don't get the height box, which should tell you you're doing something wrong.

While hotspots are usually low-utility in modeling, they are almost required in laying out sheets. Hotspots are visible and detectable in drawings placed in layouts. They cannot be printed. When placing alignment hotspots, use a prints-black pen (I like 5), so you see them against the white of the layout area and the grey of the rest of the window. Some applications:

Update for AC10: I'm leaving these in for now, but these techniques are generally obsolete in AC10. In 10, everything in a drawing is detectable, just like you're looking at the model directly. Many drawing alignment issues can be handled directly now. (Plan alignment in 10 here.)

• Hotspots at the corners of the drawing area in the plan window, for aligning the plans on the sheets. Since all the plans will use them, they should be on the Archicad layer. The templates have drawing area objects and hotspots for each sheet size. You'll probably need to move them to frame your project correctly. Though the object shows on all stories, the spots need to moved on each story. Alternately, you can move one group and copy it to the other stories, deleting the old ones. These spots should be grouped and locked. In PM, you may have to resize the drawing frame to fit these spots.

• The drawing area matches the available layout area within the title block. There should be hotspots in the title block at the four corners of the big empty space. There should also be spots at the center of the sheet number box, and the left edge of the (optional) sheet title box. In the templates this is done.

• Use hotspots to align drawings as they are aligned in the building, such as two wall sections next to each other, or parts of the same wall section. Place hotspots on a common point of both drawings, such as a wall or floor plane, then drag the drawings in PM to align the spots.

You can drag and drop libraries to the Library Manager from the Finder.


Like this

In Library Manager, the History tab shows the libraries that have been loaded recently (since the last Clear or Clear All). This list is independent of any particular project.

Typically we use the exact same libraries all the time. But there are exceptions; sometimes you need the version 7 library, for example. If you've loaded that library recently, you can add it from the history tab instead of scrolling through the whole Local/LAN tree.

It's also helpful if you take projects home. When you open a project in a different location, the library manager will come up because the servers aren't there and your local Archicad folder path is different. But the history tab remembers the local instances of the libraries, making it easy to load them quickly.


If you load a "wrong" library at some point, you can use the "Clear" button to delete it from the history so you're not tempted by it in the future.

A particularly self-starting member of the Archicad community, Karl Ottenstein, has developed an add-on called QuickDisplay, which allows us to assign keyboard shortcuts to various display options. The commands are toggles, which means you can strike a key turn the Section Depth (e.g.) on, and then strike the same key to turn them off. He has generously allowed this add-on to be used free of charge. Here is the Archicad Talk topic where mad, righteous praise is heaped upon him.

Here is Karl's page with full instructions for the add-on. I will summarize the high points.

Get the file from 3 Resources : Add-Ons. Place it in your local Applications : Graphisoft : Archicad 9 : Add-Ons. Launch or relaunch Archicad.

Your Display menu should now have a QuickDisplay submenu at the end. Here you will see commands for toggling various display options.


QuickDisplay Submenu

Naturally, and I hope obviously, you don't go to this menu to activate the commands. That wouldn't be much of a shortcut would it. The commands have to be on a menu in order to have shortcuts assigned to them.

As you can see, I only have shortcuts assigned to two of the commands, Section Depth and Line Weights, on F4 and F5 respectively. I toggle the others much less and I don't need a shortcut for them. You can do whatever you want.

I have updated the RND Keyboard scheme with these two shortcuts. You can import the updated scheme at Options -> Work Environment. The scheme is located at 3 Resources : Work Environment : RND Profile : Shortcuts.

For information on assigning shortcuts, see the Archicad Reference Guide, page 153, or ask for help.

The question is, when you change the height of a door or window, does the head or the sill move. In real life, we want the head of the door to change, but the sill of the window. In olden days the sill would control no matter what. In AC8, they offered a preference, but it applied to both openings, so either the door or the window still behaved wrong, which if you think about it is no improvement at all.

Now, in AC9, they have it straightened out:


Options -> Preferences -> Construction Elements

Here's a new trim layer. It shows in the same layer combinations as the other 'F Trim'. In addition, it shows in the reflected ceiling plan, which is the point.

Place Crown Tool objects on this layer and you can avoid redrawing the crown for the RCP.

The layer has been added to the templates. Add it to current projects if you like. More on creating layers here.

Why?
1. Maybe you want to email it somewhere (like home).
2. Smaller files are more reliable. Less chance of corruption.
3. They save and open faster.

How?

More»

OK I should have done the foundation stuff in the meeting today because it would have given me the opportunity to demonstrate polygon editing for walls, lines, etc.

More»

You can't place a detail marker in a detail window. Rats.

You can change the linked drawing of a placed marker by opening the settings and clicking 'Browse' underneath the detail name.

I've updated the other post with this info.