
With the detail tool and a well-developed model, trim details can be developed pretty quickly. The oddball is rakes, since there's no way to cut a non-plumb section. You need to take extra steps to correct the distortion arising from cutting through sloped elements. A conventional resize won't work, because you can't restrict it to one axis.
The trick is to create a patch and then adjust its vertical dimension.
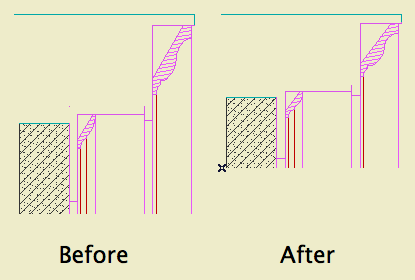
The goal.
1. Marquee the area you want in the detail and create a patch.
2. Figure out the conversion factor. There's at least two ways to do this, I like the first one.
a. SIN(90-RoofSlope). Example: 10/12 pitch is 39.8056º. SIN(50.194)=0.7683.
b. (True thickness of roof) divided by (plumb cut height of roof). These values are readily available in the info box. Example: A 10" roof at 10/12 pitch has a plumb height of 13.017". 10.0/13.017=0.7683. Tip: Much easier if your working units are decimal.
Four decimal places is fine. If the factor is greater than one you've made a mistake.
3. Now you can either a) drop one line into the patch's 2D script, or b) calculate the adjusted height of the patch and change it in the settings.
3a. Open the patch object. At the top of the 2D Script type:
MUL2 1, [ConversionFactorFromAbove]
For the 10/12 pitch, that's:
MUL2 1, 0.7683
Save the object.
3b. Multiply the 'natural' height of the patch by the conversion factor. Select the patch, and put the converted height in the Y field.
Either way, you're squeezing the patch so the vertical dimensions of the elements are right again. Horizontal is unchanged.
4. Create a detail. I recommend an independent detail, since the source view data for a detail generated from the window will never be right; it will be pre-patch distorted, and you'll have to delete all of it.
5. Place the patch object in the detail window. Tip: Cut and paste it from the section window. You don't want it hanging around the section anyway.
6. Select the patch and explode it (Cmd+=). Now you have 2D lines and fills as if you had generated the detail directly. Except: All the elements are of one big group. Also, there's an 'Air Space' fill element in the shape of the patch, which you don't need.
You can trash the patch from the library if you wish. It is no longer needed. On the other hand, it doesn't take up much space. Whichever.