
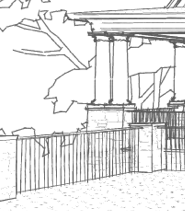
Location: 06 Wood and Plastic / Railings & Stairs
Here's a new railing object. It should be the only (simple) one you need, since it can be interior or exterior, and level or sloped.
The railing can be sloped or level. For a slope, put in the rise and run parameters. If the Rise parameter is 0, the railing will be level, and slope-related parameters will be hidden, including the Run (Tread Width).
The height is the distance from the first nosing at the bottom to the railing. (The red line is the bottom of the railing.) You have to tell it where the first tread is. This is the purpose of the Post to 1st Nose parameter. This parameter is editable in plan, so once the railing meets the newel, you can stretch the nose distance to the first tread. It's also editable in 3D, which means the spot shows in section. In section, the nosing distance spot should be at the top front of the first tread.
(I have intermittent success with 3D editing hotspots in section. Sometimes they work, which is really great. Sometimes they don't. I don't know why. It's worth a try. When they work, you can do the entire configuration of the railing (length, elevation, nose distance, rise/run) in section.)
When the railing is sloped, the baluster spacing is determined by the Tread Width and the Balusters per Tread parameter. For level railings, the spacing is set by the Baluster Spacing parameter. To turn the balusters off, set either the Baluster Spacing (level) or the Balusters per Tread (sloped) to zero. At this time, the balusters can only be simple rectangles, but that could change. The balusters are modeled with their own (light) pen, 31 by default.
I'm embarrassed to point out the parameter Add Baluster at Top (Hack), which gives you the opportunity to add a baluster when my careful calculations gag and leave a big space. I give up.
March 2009 update:
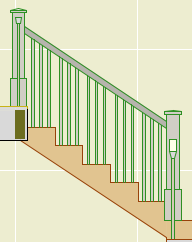
The bottom railing is optional. To turn it off, choose "none" for the type. The top rail can be Deck Stock, Interior, or custom (set the width and thickness). I'll probably add more shapes, especially if someone asks.
Either end of the railing can be cut back on home, above, and below stories, to accommodate cutlines. Once the top or bottom is cut, the cut distance can be edited in plan. A separate pen can be used for stories above and below, to distinguish among railings.
The railing can be cut back in plan to allow for a newell cap. The cutback at either end is controlled by the 2D Cutback parameters.
If a baluster is cut through, it is drawn with a light line and empty fill, so you can't tell. I recommend a 3 pen (e.g., 33) for the object section pen setting.
Almost forgot. When the railing is placed on a stair, without a bottom rail, an SEO subtraction is required to get the balusters trimmed to the stair treads.