
This started, as so many things do, with making a symbol fill for a tile pattern. A challenge of symbol fills is they need to tile (left and right meet, top and bottom meet, invisibly).
You can make new grid, running bond, and herringbone fill patterns by duplicating the extant ones and changing the dims. Anything more complex, you need to draw and work out the tiling.
That's just the fill pattern, which is vectorial, meaning you can use it in plan and surface fills in elevation. But you are on your own in 3D (OpenGL, BIMx). If you are delivering BIMx, you need to keep your textures in sync with your fills. Here is a simple way to do that.
You drew a perfect tile of lines to make the fill pattern. Now place a solid fill behind the lines. You can manipulate the pens of the fill and lines to simulate the colors of the tile and grout lines. These changes won't affect your pen sets - you can create a new pen set for this purpose or let the pens be custom. (If you are doing multiple tile patterns, I would save a pen set.) Then choose one pen for the lines (grout) and one for the background (tile). You will vary the color and weight of the line pen, but only the color of the background pen. Turn true line weights on to get the lines the right width.

Copy and paste the left into a symbol fill, screenshot the right into a texture
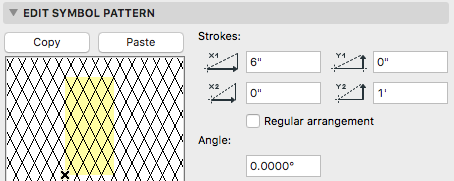
The stroke dimensions will become the texture dimensions...
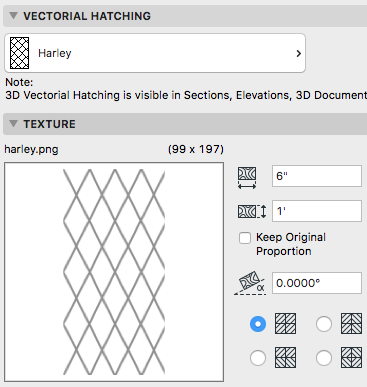
...like so
This is a very analog process. The line spacing is correct in model space, but the line width and colors are approximate. The result is going to a be a bitmap after all.
When the lines and background look right, take a screenshot of it. (I told you it was analog.) Then you can fine tune this image in a photo editor, and save it into a loaded library. These are not the most photorealistic textures you have ever seen - they are quick and dirty images that are consistent with your vectorial fills.
The new surface you make includes the symbol fill (lines) and the image of the texture. To make the texture pattern the right size, you just need to put the model space dimensions of the tile pattern into the texture size for the surface.
So that hand-drafted pattern produces the symbol fill and the 3D texture.
This got me thinking that there should be a way to create these line patterns more quickly, and parametrically. So here is a 2D object which makes patterns that can be exploded into symbol fills and screenshotted into textures.
There are currently nine pattern types. Given the Unit Length and Width, the object draws whatever is needed to get the pattern to tile once. Use the Grid Repeat parameter to repeat the pattern more than once. Grid Repeat is graphically editable at the lower right corner. Unit Length and Width are graphically editable at the lower left, or at the first sensible location.
The Line Pen draws the lines. This is the pen you will adjust to get the grout thickness. The Fill will usually be on, and it will usually be Empty Fill. The Background Pen is the pen you will adjust to get the tile color. (The only reason to change the fill I can see is to use an image fill for a pre-textured background. I'm not even sure this is a good idea.)
The background extends beyond the line pattern to allow for a margin when taking the screenshot.
I've provided calculation parameters to help choose the joint line width. Put in the desired model line width and the window scale, and it will tell you the proper line weight in millimeters.
The object's length and width parameters will show the size of the generated object. Use these dimensions for the texture size in the surface settings.
The pattern types have their own special parameters as needed.
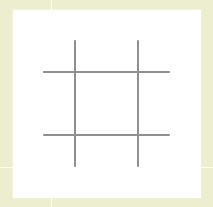
Grid: This is sort of just for completeness. I hope you can all figure out how to draw a grid.
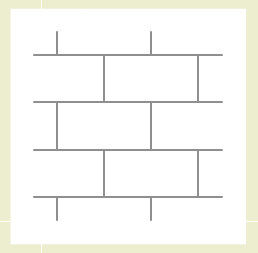
Running: The units are offset by a half unit by default. If you make the Shift parameter non-zero, you can have a custom offset. It is graphically editable.
Herringbone: In this pattern the unit length will snap to a multiple of the width, because that's the way herringbone rolls.
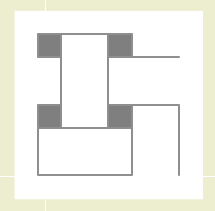
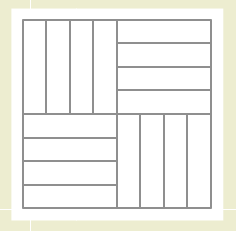
Basketweave: The square dot is automatically defined by the length and width of the unit. The dots can have a different pen from the lines. When making a basketweave symbol fill, you will need two fills - one for the dots and one for the lines (assuming the dots and lines use different pens). Then you use the fill origins to line them up.
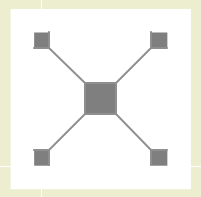
Grid with Dot: A square grid with rotated squares at the intersections. Like the basketweave, you'll need two fills to vary the pens.
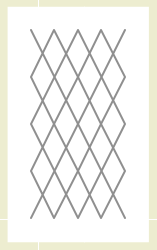
Harlequin: Diamonds (rhombuses).
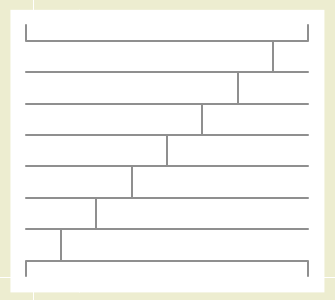
Staggered: A stepped running bond. The Repeat parameter defines how many tiles are drawn before the verticals line up again.
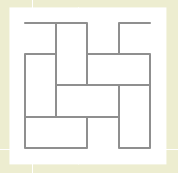
Parquet: Alternating squares of vertical and horizontal. The Parquet Repeat parameter defines how many tiles in a square.
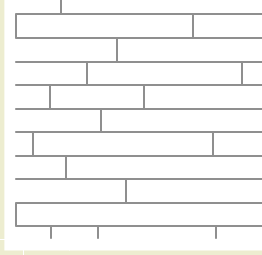
Random Boards: The vertical lines are hard-coded pseudo-random (i.e., I drew-and-dropped them), in proportion with the length. I worked off of a 12-foot length originally.
It's not a very good video, though.