
Adapted from my brief presentation at the DC Archicad User Group meeting earlier this month. If you want to look at the files, there is a download link at the end of the post.
This is a simple scheme for using a single site model for multiple projects. It is applicable for everything from detached garages, to townhouse blocks, to proper campuses. The goals of this scheme are:
• Consistent 2D and 3D site data in each project, maintaining accurate story information.
• Visualization of the whole property in BIMx, while all buildings are easily kept up to date.
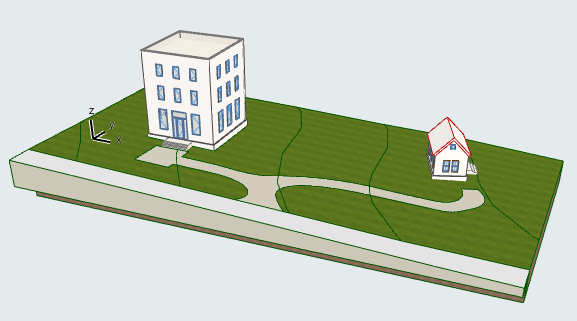
In our usage, the site is part of the main house's file. The site can be in a completely separate file using the same technique. The BIMx is published by the project file which contains the site. I will refer to the main house file and the small house file.
The module published for the use of the small house file contains the site 2D & 3D. This should include the site mesh element(s), roads and driveways, landscape walls, and trees; along with the permanent site annotations such as topo lines and labels, and survey dims.
Also included are the site cutting SEO operators. The operator for the small house must be copied and pasted independently from the small house file - it can't be part of the published small house model. This is because you can't include part of an HLM (hotlinked module) in module publication.
We have a separate layer for permanent site annotations, distinct from site plan annotations for the specific project.
If project north is a different angle in the separate projects, then the north arrow object should not be included in the publication. If the project norths are the same, it can be.
You should have a layer combination of everything you want to publish.
The small house model, see File 2 below, is hotlinked into the main house/site file. Keep the story elevations as in the story structure in the hotlink source. (This option, which makes this whole process feasible, is new in Archicad 21.) Use a dedicated layer to control display of the small house model in the main house file. Use this layer as the master layer of the hotlink. All the layers in the two projects are the same, and we typically don't want to see the small house in the main house's documents. The only layer combination where the control layer is on is the BIMx combination.
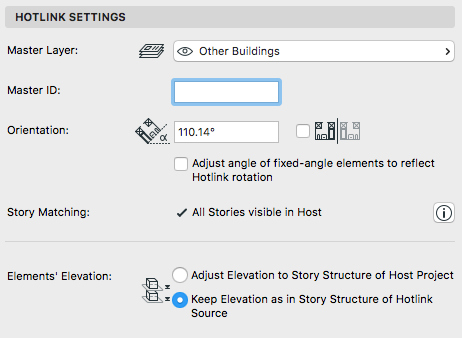
Settings of the small house hotlink
To set the elevation of the module, it is useful to have set sea level in both projects. The difference between the two sea levels will be the elevation of the small house module. (It may be positive or negative depending on which building is set higher.)
The module published for placement in the main house/site file contains only the 3D model layers of the house itself, with no annotations and nothing site related. Make a layer combination.
To publish a multi-story module, save a view of any single story with the appropriate layer combination. It's not needed to make it a clone. Choose module file as the format. Then in the Save Options of the item in the publisher set, choose All Stories.
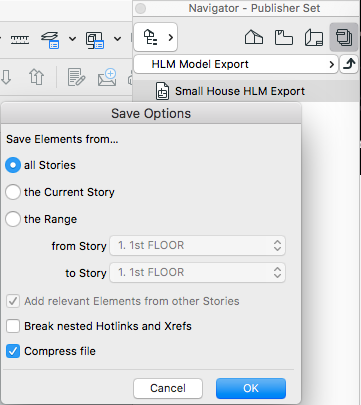
Small house model publication
The site model, see File 1 above, is hotlinked into the small house file. Typically you would not need a control layer for this module, since you want to see the site elements just as if they were local. You can use the Archicad layer as the master layer.
The module elevation will be the inverse of small house module elevation in the main house/site file.
Schedules. Use criteria to exclude elements from hotlinked modules. There is currently a bug in Archicad which causes this criteria to behave backward, so you will have to change your schedules when they fix it.
Attributes. Attribute management is a large topic out of scope of this post, so suffice to say that attributes should be kept in sync between the files. This means if you create a new attribute (surface, profile, fill, whatever) in one file, you should copy it to the other file, with the same name and ID, using attribute manager. Hotlinking will create attributes if the names and IDs don't match, and this will quickly become confusing and could lead to errors.
Text orientation. Check the Always Readable checkbox, which you probably already have. This is the best you can do, though it won't force text in a rotated HLM to be vertical. Just not upside-down or left-facing. Relative/Absolute rotation angle of text has no effect.
Copy the site cutting elements from the small house, paste into the main house file, and SEO operate on the site.
Publish the site and cutters from main house.
Hotlink the site module into the small house file, and adjust the elevation.
Publish the small house model.
Hotlink the small house module into the main house file, and adjust the elevation.
In the main house/site file, edit the site around the small house, then republish, and update in the small house file. If the small house changes, republish and update in the main house file. If the small house footprint changes, you also need to re-copy the site cutters.
Download sample files here. To do the publication and hotlinking you will need to change the paths.