
As follows...
A VR Object is a Quicktime file made by multiple cameras arrayed in a hemisphere. When you view it, you can move from viewpoint to viewpoint, giving a very convincing illusion of moving all around the house. They have a very high impressiveness/difficulty ratio. They are indispensable to a client presentation, and they're pretty handy just for us. And they're *easy*.
Of course, the model needs to look really good, at least from the outside, but you're doing that anyway. Yup.
1. Set up the VR Object Camera.
Go to the camera tool settings and select the VRO tab. It resembles a half-globe.
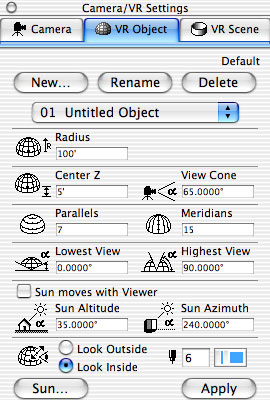
VRO Settings
(The camera settings box is non-modal, that is, there's no OK button and it doesn't need to be dismissed. You must click 'Apply' for any changes take effect. Typing return does nothing.)
Radius: 100'-125'. Depends on the size of the plan. Too big and the house will be far away, too small and corners will be cut off. Adjust the radius after placing the camera, when you can see the view cone.
Center Z: 5'-6'.
View Cone: 65-70�
Parallels and Meridians: There will be one camera at each intersection. There should be twice as many meridians as parallels. More is better (more views, smoother movement), and slower. If running overnight, use a minimum of 24/48. Tip: to do a quick check of your model and settings before running the VRO full size, use very small numbers of parallels and meridians, maybe 4/8.)
Lowest View: 0 (Horizontal)
Highest View: About 70. You can use 90 and look straight down, but it's not worthwhile. Lowering the 'top' gives you more views lower, where there's more to see.
Skip the sun settings in this box. If you want to turn the sun on, use the real sun settings via the 'Sun...' button. (This is the same sun dialog you get by clicking 'More Sun...' in the 3D Projection Settings. They have different names in order to be idiotic.)
Reminder: Apply.
2. Place the camera.
Click in the middle of the plan to place it. Drag it around as necessary.
Notice the view cone. By default it's on the right. To move it, click on it with the camera tool active. You'll want to move it because the position of the cone becomes the starting viewpoint for the finished VRO. Keep it on the edge of the circle. Tip: Drag the cone around to check if the house lies within it from all angles. If it doesn't, increase the radius. Don't forget to put it back at your desired starting viewpoint.
3. Set the PhotoRendering Settings.
Image | PhotoRendering Settings | Effects.
Method: Best.
Antialiasing: Best.
Effects: Highlights, Fog (61% gray), Emission, Transparency, Smooth Surfaces. Make sure textures is off.
Light sources: Sun. No Lamps.
Shadow casting: Sun, if you want. No me gusta. My opinion. Casting shadows lengthens the rendering time by about 4X. The night is long. I don't like shadows, even if they took no time. They don't add much other than a lot of darkness on one side of the house. But, to each his/her own.
3.1 A note on Sun.
For accurate shadows, project north must be at least approximately correct. This is set in the sun settings.
In AC7, in order for the sun in your rendering to reflect the settings in the Sun dialog, Shadows must be on (Contours Off) in the 3D Window Settings. (The same place you turn the fills on and of for 3D.) Otherwise, you will get the default sun position, which is very probably way off. This bug is fixed in AC8.
4. Set the PhotoRendering Settings some more.
Go to the Size & Background tab of the PhotoRendering Settings.
Colors: Light blue is ok. White is ok. Never use a picture. Use the same color for sky and ground.
Resulting Image: Use a 1/1 ratio (a square). Bigger=Slower. 600x600 is adequate. Smaller for checking. Resolution is fine. Skip 'Size to 3D Window' and 'Keep Proportions'
The brightness and memory tabs shouldn't need any attention.
5. Run it.
Image | Create VR Object... Note that this menu option changes depending on what type of camera is displayed.
From the pulldown, QTVR 2.0 Engine.
Source: PhotoRendering Window.
Result: Millions of Colors.
Leave the checkboxes and don't worry about 'Set.'
Save.
Save it in [Project] : 03 Movs & Pics : VR Objects with a name of the form "VRO 09-28-03 PROJ.mov.
The end.
09-28-03