On Land

Environment Information
At Rill Architects we run Archicad on macOS. If you work at Rill, this is your stuff. If you don't, but you work in Archicad, you may find something interesting. Anybody else, I don't know.
RSS

Here I present an extra-strident version of the usual consistency argument.

Graphisoft should adopt as an unbreakable regulation the idea of a Standard Element. All elements would be required to meet the standard, otherwise they're not elements. Graphisoft would mostly be enforcing this law on themselves, though add-on developers would be bound by it as well. In turn, Graphisoft would have to provide the API tools to create compliant add-ons.

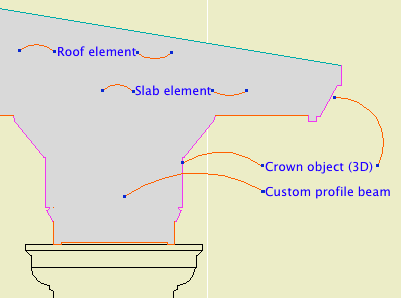
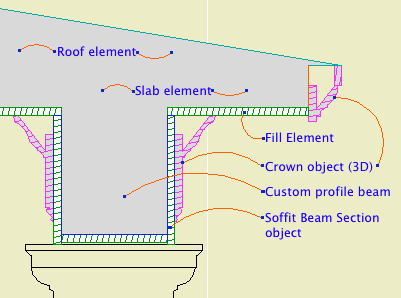
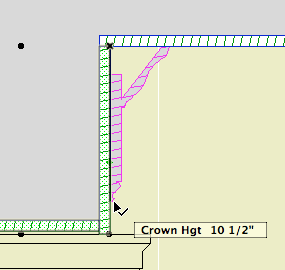
Going forward, new element types created by Graphisoft in future versions would be required to be Standard Elements. There shall be no more situations like 'Here, we have custom profile walls, except they don't curve. Except they don't calculate. Maybe they will some day, be patient, be thankful for what you have.' Except, except, patience, patience.

It should go without saying that all elements can do certain things. When you hear of a new element type in Archicad 12, 13,..., n, curved roofs maybe (hope hope hope), no one should have to say, 'Hey, it has curved roofs. I wonder if the curved roofs will be able to [do some obvious thing that all other elements can do].'

When you add Profiling to the wall tool, it is mandatory that profile walls do everything conventional walls can do. No exceptions. If they can't, then they're not done. Finish them.

The increasing inconsistency among element types makes it harder for the user to 'forget' the program and just work.

I'm not qualified to write such a standard, though I'm willing to start. The important thing is that it exist, and users have a reasonable expectation that it is being followed. Do you think it exists today?

• A Standard Element has complete pens and fills: Section, plan, cover, 3D, overhead. Yes, cover fills for walls, cover fills for beams. Quick, what's the line type for a slab one story down? With truly standard attributes, Edit Selection Set works on all of them.

• A Standard Element interacts with the Floor Plan Cut Plane. (SEO's are another matter, but there's no excuse for conventional wall-roof trims not showing.)

See, standard doesn't mean perfect. We all wish for SEO display in plan, but it's a big step. According to the Standard Element Law, when/if SEO plan display is introduced, it has to work for all elements. None of this 'SEO's show in plan! (Except meshes.)'

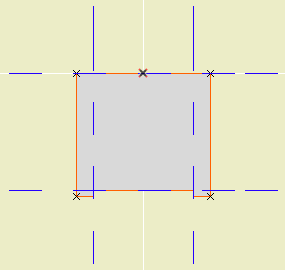
• Standard Elements clean up on a by-polygon basis. Element type is irrelevant. Wall corners are irrelevant.

• A Standard Element has complete listing and calculation ability. All global variables are listable. Anything that can be labeled can be listed or scheduled.

• Standard Elements can be grouped. Windows, sections, drawings, I'm looking at you.

• A Standard Element uses polylines. Beams, I'm looking at you.

• A Standard Element can be stretched in various, consistent ways. Columns, I'm looking at your plan symbol. Hey, Marquee, stretch the @#$% objects already.

Pelicans, snakes, whales, people, they're all vertebrates. Below all the special traits, they have fundamentals in common. I want to see an Element Phylum, where certain characteristics are present, without question or thought, simply because the things are elements.

So don't give me curved roofs because I wish for curved roofs. Give them to me because Archicad has curves and Archicad has roofs.

I yield the balance of my time.

(1) A custom profile for modeling and (2) an object for annotation.

Profile:

Soffit profile
In the profile editor
• The shape is that of two fascia boards with a reveal of 1/4" below the soffit board.

• The horizontal stretch extents are inside the fascia board reveals. This way, when you adjust the overall width the fascia thickness will be unchanged. Similarly, the vertical stretch extents go from the top to the underside of the soffit, leaving out the reveal.

The custom profile tech only allows you to stretch one dimension horizontally and one vertically. You can exempt parts of the profile from stretching, but you can't stretch them independently. If you want a different reveal depth or fascia thickness, you'll need another profile.

• Profiles can stretched bigger, but not smaller. (I call this a bug, but what do I know.) Any profile you intend to use with varying dimensions needs to match or be *smaller* than the smallest case you have.

• The templates have two profiles, Coffer Beam and Coffer Beam Half. Both are 4" x 2" which should be small enough. The half version has the fascia on only one side and is meant to be placed along a wall.

Remember that profiles are attributes, so they're within the project file, so you can edit them without messing up anybody else. And: You can use Attribute Manager to bring profiles into the current project from the templates.

Here is a sample condition at 1/4" scale, no detail added:

1/4 scale soffit

At higher scale, we need to add detail:

3/4 scale soffit

Object: Soffit Beam Section JM10

Location: 06 Wood & Plastic / 2D Wood

The object fits within the profile's perimeter.

Height and width of the object will match that of the beam itself.

• Parameters for Fascia thickness and reveal.

Crown Hgt sets the point at which the pen switches from the object's cut pen to the Separator Pen. In practice this height should meet the bottom of a crown object placed against the beam, which will maintain the heavy outline.

Crown height stretch

• The Half option uses one fascia board to work with the half version of the profile.

Commentary:

We build one model. We take views of the model and annotate them as needed. We will take views of the model at various scales. Scale is fundamental to architectural documentation: As we look closer, we see more.

Yet Archicad lacks any meaningful automatic scale sensitivity, except that written into objects by people who want it such as me.

In this example, see how the crown objects draw themselves as empty blobby things at 1/4" scale, but they're detailed shapes with proper fills at higher scales. The roof, slab, and beam elements, not so much. (Archicad library objects, not so much either.)

Since we can't get conventional AC elements to detail themselves according to scale (yet, I hope I hope), we need to build a model that can accommodate the detail we need to add. This is the idea behind something like the Stud Wall Detail object. The wall is empty, and we place the object in the viewpoints that need it.

The soffit detail described here has always been tricky. If you approximate the beam with a rectangular model, it's difficult to manage the reveal without masking. It's easier to add 2D detail than to subtract modeling.

A custom profile allows us to handle the cased beam in the "Empty Fill +" fashion we are accustomed to with walls, roofs, and floor decks.

Something to think about, or maybe not. Not all objects have to be right in every way.

Plan symbol
Plan symbol on remote stories
3D hidden line
3D shaded
3D render
Elevation
Elevation in distant area
Section
Polygon efficiency
Scale sensitivity; which compounds the plan symbol, section, and polygon issues
Listing
Labeling
User interface
Parameter list
Parameter transfer management (Unique parameters)
2D graphical editing
3D graphical editing
Selectability
Code maintainability
Intra-library consistency

A frequently used, complicated, widely viewable object, such as a window, needs to be right in virtually every way.

The development environment gives very poor support for many of these requirements. As Archicad adds features, items are added to this list. Irritatingly, the environment has not kept up, and is way overdue for a tear-down. There is no section window, no remote stories, no graphical editing. The full features of the current GDL architecture are not supported, so we can't even imagine modern development features such as syntax coloring and auto-completion.

One of those things that bothers some people more than others.

Accuracy is first. Completeness is second.

We're talking about construction documents of course.

The end product of our work is a building. The documents are the primary device for ensuring the building is executed in accordance with our design intent. Therefore, in evaluating the quality of documents, we are really talking about their reliability. Using these documents, how close to the design intent can the builder get? How much extra effort will be needed on the part of the builder, or ourselves, to clarify the design intent?

So the most critical value is accuracy. If information is in the documents, it needs to be correct. There is no way to tell accurate and inaccurate information apart. If information is missing, the builder will need to ask for it. Better to be missing than wrong.

A corollary of accuracy is consistency. If information is repeated in the documents, the repetitions need to be accurate. Since changes + repetitions = maintenance, repetitions should be kept to a minimum. Remember unity.

Assuming all the information in the documents is accurate, there should be as much of it as possible. The second most critical value is completeness. While we want the builders to call if information is missing, we don't actually want them to call. The challenge is to maintain accuracy while improving completeness. Especially when under deadline, accuracy is at risk when you focus on completeness. Remember, as you are wondering how you will ever "finish", that accuracy is more important than completeness. It is dangerous to "just get something on the drawings," because once it's there it's easy for us to forget it's not accurate, complete-looking as it is. If you don't have time to do it accurately, leave it out, let them call.

Right, so you don't have enough time. This is bad news for the aesthetic enhancement of the CDs. You can't invest time in making the drawings more pleasing to the eye if they aren't complete and accurate. So beauty is third, and lots of times you won't get to do as much of it as you'd like.

Hey, it's not last. Last is probably 'use of whitespace' or something. Having kicked beauty most of the way off the train, now I'll give it a hand up.

Beauty should be considered in standards, since that way it can be automated. If a standard is set, a beautiful solution is no more expensive than a plain one.

And listen, we're talking specifically about technical construction documents, not the building, materials, presentation drawings, competition entry, finish selections, or conceptual solution.

There are six.

Impossible: Literally. Not a slang term for "very hard". Some people will say that nothing is impossible. This is obviously not true.

Somebody: Nothing is impossible!

Me: Can you walk to the moon?

Somebody: Of course not!

Hard: Possible with effort, time, concentration, creativity, energy. Example: Flying to the moon.

Tedious: Requiring time and energy, but not creativity. Example: Flying to Florida.

Easy: Nearly effortless. Apparently requiring little time or energy, yet accomplishing a lot. Example: Calling Florida on the phone.

Automatic: Effortless. Takes care of itself without attention. Example: Answering machine.

Invisible: Out of one's hands. Forgotten. Examples: Eyesight, digestion, electricity, democracy.

Individual skill development, and technological progress, means pushing tasks down this scale. Advances in knowledge make the impossible merely hard. With further development and practice, hard tasks become tedious. Tedious work is speeded up and becomes easy. Easy work becomes easier and easier until it's no longer work, it's automatic. Automatic tasks are forgotten and become invisible, as we focus our energy on the hard and tedious work we still have.

This leads to some aphorisms:

From a workflow standpoint, inefficiency comes from not knowing the degree of difficulty of a task. If you overrate the difficulty of a task, you're doing it the "hard way". The worst case is to mistake a hard job for impossible, and not try at all. On the other hand, if you underrate a task's difficulty, it probably won't end up done right. For example, if you think something tedious is easy, you won't dedicate the required time to it.

Getting from impossible to hard often depends on external developments. The impossible needs to revisited occasionally, to see if other developments have moved the task to hard. You can't make vaccines until you know about the immune system.

Working on the impossible without expecting it to be accomplished grows knowledge that might be useful later.

Don't mistake your own fear of difficulty for impossibility. Don't mistake your own impatience with tedium for difficulty. Visualize non-impossible stuff getting easier.

It is hard to determine if a task is hard or impossible.

Automatic and invisible tasks need to be periodically looked in on.

That is all.

A single building element, how about a window, will be represented multiple times in the construction documents.

There's the window in a plan, at least one elevation, often two or more sections, maybe/probably an interior elevation, maybe a wall section, and the window schedule. Then there are dimensions and annotations related to the window. Five to fifteen representations of one element is probably typical.

The goal is to generate these representations with as few project elements as possible. The ideal is one. With a one-to-one ratio of project elements to building elements, you can focus on manipulation of an element, knowing the representations will largely take care of themselves.

With multiple project elements per building element, it falls to you to maintain the integrity of each and every representation. You work more, do the same things over and over, have less fun, and make more mistakes, which, considering how hard you've been working, is a downer.

When you choose to draw a building element that could be modeled, you are shifting the responsibility for the representation of that element away from the software and onto yourself. When you unlink a section/elevation, you are signing on to change that one door or window multiple times. As multiple building elements change multiple times, the added work, and the risk of error, grows exponentially.

This ideal of of unity is only partially attainable with current technology. But you should have a good grasp of how attainable it is.

For example, full-height walls are relatively unified. They display well, automatically, in a wide variety of contexts. Low walls, however, are less unified: Since the plan and section fills can't differ, you need two elements, a wall and a slab, for the the plan and the section. (Update: In 10 this is somewhat improved. You can show a top view of a wall, but you can't control the fill.) (Update: In 20, you can use Graphic Overrides to put a background fill color on the top. No fill pattern, just the background, but still an improvement.)

The reflected ceiling plan is a great divider. Many elements need to be drawn over. Beams, dashed in plan, need to drawn solid, while floor elements, solid in plan, need to be drawn dashed. Given the current design of the software, we're stuck with this. Update: Graphic Overrides changed everything.

A lot a higher-level object design is concerned with getting objects to multi-represent themselves better.

Our job as users is to know these limits, do our best within them, and work around them when we can. If you can cut the number of project elements for a building part from 5 to 3, do it. Reduce repetition where it can't be eliminated.

Part of knowing the limits is noticing when they change; note the RCP comment above. It's important to stay informed about developments in technology which can lessen repetition. This includes improvements in software and in our own libraries and standards. This, in turn, means a willingness to change our habits, abandon obsolete workarounds, and adopt better techniques.

These are the primary functions of layering, in order of importance:

1. Control of display for output. The finished output has to show and hide the right elements.

2. Control of display for working on the project. Showing and hiding elements depending on the work you are doing at the moment.

3. Promotion of logical thinking about the project as a building rather than as a bunch of drawings.

4. Protection of elements used for reference. For example, the walls are locked when working on the structure plans.

Layers exist so elements can be shown, hidden, and locked as needed. Beyond that, layering helps keep the project straight in our minds as we work on it. To this end, layers should be:

Sensible. An architect using an architecture-oriented CAD program should expect to find a layer for "Walls". They would also expect a layer for fireplaces, even though walls and fireplaces display together and don't technically need separate layers. "Put the fireplace on the wall layer" doesn't sound right. In keeping with Virtual Building principles, our layers relate to building parts first, and annotations or drawing types second.

Truthful. I recently added a layer, S Deck, for floor-structure slabs. Previously, we used S Slab. I decided it was poor thinking to call joist decks and concrete slabs by the same name. Layers should encourage clear thinking about the building itself.

Logically Consistent. A stair will be made of elements which display in plan and elements which are 3D-only. So we have two layers, A Stair2 and A Stair3. This arrangement should apply to all assemblies which are split between plan and 3D, such as soffits.

Here's another way of looking at it:

In the design of Archicad, the floor plan is the "main" window. Close it and you close the file. Every element must be on a story, and therefore visible in the plan window at some point. (Even though you can place elements in 3D.)

The first function of layering is to separate the Plan- and 3D-only elements. If we only did architectural drawings, we could get by with just those two layers, Plan and 3D. We would have two layer combinations, Plan, showing only the plan layer, and 3D, showing both layers. This setup meets the minimal display requirement above.

But it would be very difficult to work with. Productivity would suffer as the user went insane. So within the architectural, we have lots of plan layers and lots of 3D layers, which correspond to building parts. In the plan we have walls, cabinets, fixtures, etc. In 3D we have floors, structure, trim, etc. The addition of these layers doesn't advance the display requirement at all, it just helps us stay sane.

It helps our work to have layout and guide elements. Those need layers, since they have to be hidden for output. It's convenient to be able to "permanently" hide elements without deleting them, trashcan-style. It's handy to keep area-measurement fills in the project, but we don't look at them very often. So there are several kinds of administrative layers that don't directly represent the project or the output.

Then there's the invisible modeling tools, cutting roofs and SEO operators.

Once we get into other drawing types, structure plans, etc., those drawings have their own annotations, and require different architectural elements to be shown and hidden. The structure plans require that the landscape walls (hide) be separated from the architectural walls (show). The reflected ceiling plan requires that the crown moulding (show) be separated from the other high trim (hide). If you have two site plans, you need layers for each of their annotations, and for the annotations they share.

The layer setup we have is the product of a years of refinement along these principles. When we add a layer, it should be in order to improve the logic of the system or to facilitate a new/better mode of work. For example, to model wall sections, the crown needs to be positioned taking the ceiling finish into account, and the ceiling finish itself needs to be modeled. But since the ceiling finish is only useful for wall sections, we don't take the time to build it everywhere. Since it stops and starts, it needs to be hidden in building sections so we don't have jaggy ceiling lines. Therefore we need the layer F Clg Fin, as well as layer combinations for wall sections separate from building sections.

I hope this helps answer the question, "Why are there so many layers?"

There's lots of good reasons to invest the time needed to work the model out. It helps you understand the design, find massing problems, catch tricky details, and get lots of drawings started at once.

Lately we've noticed an advantage that is distinct from these, but related. With a well-developed model, we are less vulnerable to construction errors arising from incomplete annotations.

When we leave off a knee wall height dimension, and they call and ask for it, we can go to the model and measure it. If there's a building section showing the knee wall, and the section is a model view, we can scale the wall and be confident that the relationship between the wall and the roof is correct. Now, don't tell the builder this; the prohibition on scaling to determine dimensions remains. But we're allowed to "scale" the drawings if we know the model is worked out.

Builders are invariably amazed that the ridge elevation ends up within an inch of where we said it would be, on a crazy roof with a bunch of different slopes. We would be amazed if it didn't.

Even if there are annotations missing, there is reliable data in the model. Of course, we should strive to make the annotations as perfect as possible as well. But it is better to have incomplete annotation of reliable geometry, than finished annotation of a model that doesn't actually work.

LOON ISLAND, ME -- Due to the wet spring and summer, the lake is a good 18-24" higher this year. Remember that the dock is simply resting on the lakebed and is not tied down in any way. If not kept above the water, it can blow away in high wind/waves. The idea is to elevate the whole thing while moving it closer to the shore. Keep in mind:

The dock is heavy. You will need three or four people.

You will get wet.

Wear shoes that can get wet, and that will stay on your feet; there's some mucky spots on the lake bottom.

There are rocks. This is good, because you will need to put them under the feet of the dock to elevate it. It's also bad, because you will have to lift the dock far over some of them.

The dock is built in sections that can be taken apart and moved separately. The only wrench is an adjustable one, there aren't any sockets in the cabin. The nuts are under the dock, which is awkward. Remember 'Righty Loosey Lefty Tighty' because the nuts are upside down. Try not to drop the nuts in the lake.

What? Oh! No, no, no, not that dock. That's in the System Preferences under 'Dock.'