The "General Faves" have been updated with the new poche pen for all the model elements. If you are going to change poche pen color in a current project, and you use Favorites, you should load the new version.

January 2005 Archive
All Entries | 1 | 2 | Older »
Click the flyout on the favorites palette and choose "Load Favorites". Navigate to the favorites file you want. We keep general favorites at 3 Resources : Favorites.
If you already have favorites in the list, you will be asked if you want to Merge or Replace the existing favorites. Unfortunately, "Replace" refers to the list as a whole: All the current favorites will be deleted. To overwrite current favorites with those in the new file, while leaving the others alone, you need to choose "Merge." This has its own quirk: When a matching name is found, you will be offered the options "Skip" (don't overwrite), "Skip All" (which cancels all remaining overwrites), and "Overwrite". There is no "Overwrite All", so in order to accept all the incoming favorites, you have to click "Overwrite" however many times. Another D-minus interface element.
Also, I can't stand the word "favorites". It means I have a great subjective, emotional, aesthetic interest in the item, much greater than in most items. "OMG, I loooooove this 2x4 wall!!!" No. They should be called presets.
It will be a few minutes until I can update the relevant Workflow posts re the new plotter.
PLN:
Poche Pen: Instead of using a pen from the gray region, we have a dedicated poche pen. This should make changing the color of poche easier in the future, if we ever have to do it again. It's pen 50. All the model tool defaults and composites are updated. (This change is optional for current projects, but it is supported by the new layout book.)
Finish fill pen to 92 from 93. Default of fill tool changed accordingly, along with cover fill setting for cover fill elements.
Title block, drawing area, detail area, SK objects switched to new version. Drawing area and title block hotspots replaced.
New pen settings: Adjusted weights, and color of pen 50. Attribute file: Color Pens 0105.aat. PlotMaker Pens are in Black Pens 0105.aat.
Deleted stupid drawing area from Perspective View window.
LBK:
New pen settings: Adjusted weights, and color of pen 50.
Plot setup tiffs removed.
Changed page setup for each master layout.
Adjusted title block, sheet number text, and detail grid locations for each master.
Here's a new category where I'm going to log changes to the templates. It's not required reading, but if you're curious go ahead.
This is how to install our gigantic new plotter. Installing other printers is similar in some respects.
System Preferences, Print & Fax, Set Up Printers.
Click "Add".
At the top, select "IP Printing"
Printer Type: LPD/LPR
Printer Address: 192.168.1.29
Queue Name: WINPRINT (Case sensitive)
Printer Model: Other...
Navigate to 3 Resources : Printers : RW470 : RW-470.ppd
Choose.
Add.
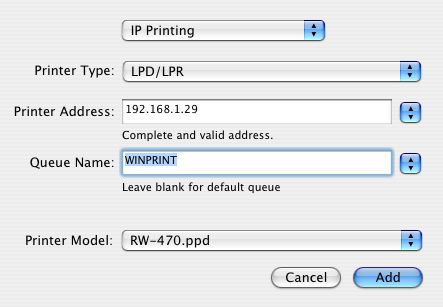
If the settings look like this, click Add.
The new printer should appear as "WINPRINT on 192.168.1.29". This is also the name you will see in Page Setup. It will be the default, unless you want to make another printer the default. (If so, select it and click "Make Default".)
Don't forget to do page setup in PlotMaker:
Go to File -> Page Setup. (Not Plot Setup!) At "Format For", select "WINPRINT 192.168.1.29". Select the Paper Size from the next pulldown. 18x24 is ARC C. 24x36 is ARC D. 30x42 is 30X42, not ARC E.
If you don't see 30X42, make sure you got the ppd file from the RW470 folder, nowhere else.
No, that's not all there is to it.
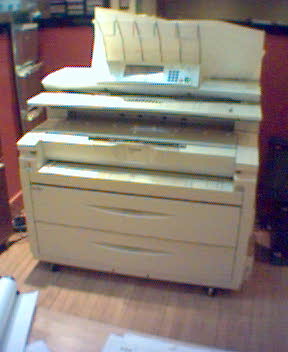
The camera makes it look fat
We have a new plotter. Actually it's a printer. Everybody calls it a plotter, though. Soon we won't plot anymore, we'll just print, like everyone else, and then we'll call printing on big sheets plotting, like everyone else, and we'll call the big new output device a plotter.
(You think I'm being technical and pedantic, but one of the main sources of trouble in getting this thing in here has been that there IS a difference, and the people selling us the, ah, machine think there isn't. It's also the cause of the hard labor you will have to do on each project to get your output looking as good as it did before.)
So we have a good news/bad news/bad news/good news situation.
The good news is that it works.
The bad news is the hard labor of adjusting our workflow.
The other bad news is the plotter requires a "PC" in order to function. A PC is sort of like a computer except it breaks a lot.
The other good news is the output is insanely fast (7 pages a minute). And, since they're forcing us to print, we will gain several appealing advantages of printing over plotting, such as easier publication, sharing, and archiving. I.e., PDFs. And it scans large sheets, so we can electronically archive Jim's basement, including the hand-drawn stuff. Wild!
Here's a summary of the changes to our lives:
� Plotting is going away, including Plot Setup, PlotFlow, and the Plot command. We will print instead.
� We won't send drawings out as often. We can print a 35-page set in 5 minutes! Twenty 35-page sets, we'll still send that out.
� You have some work to do on current projects to get them looking good. This is a big change and it just isn't magic.
� We will archive using PDF instead of PLT files. We can scan old paper sets to archive them to PDF.
Thank you for your patience as we work out the remaining kinks.
By the way, up to this point I have been trying to get our plotting ability back on line, so I'm not an expert in scanning and copying yet, let alone changing the toner and whatnot. One thing at a time.
Several related posts:
Installation
New Title Block
Project Changes
Layout Book Changes
This is an unpleasant task you should never have to do, unless we get a new plotter. You don't even have to do it then.
On the Options menu, All Pens And Colors. You get this:
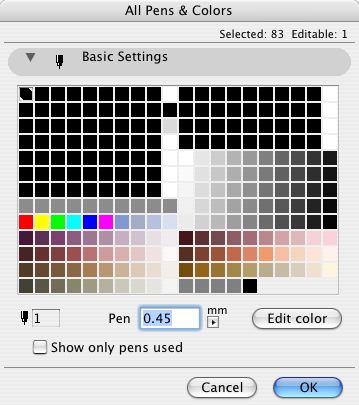
A pen has two attributes, color and width.
Set the width using the field marked "Pen". Make sure the units are mm, not Pt (points).
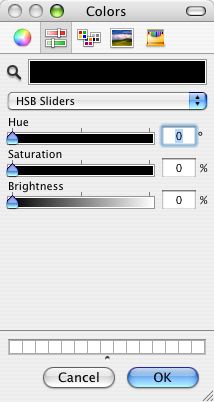
To change the color, double-click the pen's square in the grid, or select it and click "Edit Color". I recommend using the HSB sliders to edit color.
You can select multiple pens at once and edit their color or width together. Cmd+click on pens to accumulate them, or Shift+click to select a range. Like a lot of things.
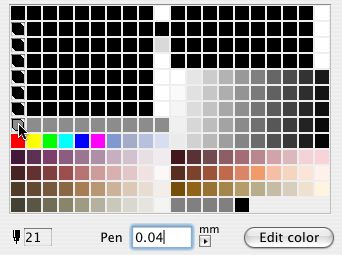
Selecting all the pens between 21 and 141.
Editing pens in Archicad is similar, but we can use Attribute Manager instead.
Since we got a new plotter, we need a new title block. Makes sense to me.
Before printing from the new plotter, you must switch to this title block object. When switching, hold down command and option and click on the new object. This is very important so you don't lose your old issue dates. If you try switching and it doesn't work, cancel out of the object settings and try again.
The object looks the same, but I took the opportunity to fix/add a couple things.
The overall size of the object, including the margins, is the same as the paper in the layout. In the previous version, the size matched the printable area. When changing an existing project, make sure the lower left corner of the title block drawing is on the lower left corner of the paper. (The outermost rectangle, if you can see a difference, which for large sheets you won't.)
You can have up to eight dates instead of five. You can limit the number date spaces to four.
If the client name doesn't fit the title block horizontally, you can make the point size smaller (Custom Project Size), or put part of the name on a second line (More Project Name). Note: This parameter is separate from the Book Info. You can still use the Book Info for the other fields. That is, if you want the second line, you have to set it in Archicad.
I turned all the pens black, and lightened the gray on the square a little.
Location: 01 General / 1 Graphic Symbols
Just like Slope Symbol JAM8, except it's a label. Used as associated label on a roof, it will convert the slope to n/12 and draw the triangle correctly. This symbol is typically used in section and elevation, but I could see using it in the roof plan.
Select the roof you want to label and check 'Label Elements' in the Info Box.
(To set the label tool to use this label on roofs, go to the default settings of the label tool, highlight Roof Tool in the top panel, and select Roof Slope JAM9 from the flyout.)
After activating the label, you will have to move it into position. Make sure "Use Symbol Arrow" is checked in the Info Box. This keeps the leader from being drawn.
To label a roof which slopes in the other direction, switch the "Mirror" parameter to On. Conventional mirroring doesn't work.
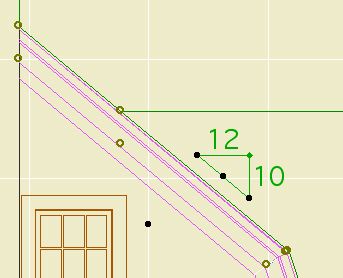
You can stretch the length using the green node.
The hypotenuse is optional for outsiders. In our standards it is on.
See Also: Labels
You can drag and drop libraries to the Library Manager from the Finder.
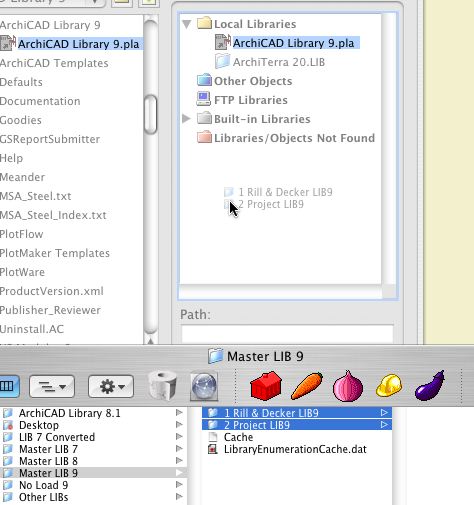
Like this
This is recommended for lots of issues, and it's at least partially voodoo. But it worked for me.
All Entries | 1 | 2 | Older »