
Background: Navigator Theory
Issue: You need plumbing (or mechanical, etc) plans, which aren't set up in the templates.
This is a piece of cake.
We'll use plumbing plans as an example.
There are no plumbing layouts, and no plumbing views, provided in the templates. There is, however, a Plumbing Plan layer combination, and a +P Plumbing Note layer. There is also a Model View Option combination called 'A4/S0/M/P', where P stands for plumbing.
Briefly, you need:
1. Views,
2. Layouts, where the views become drawings,
3. And the layouts added to your CDs Publisher set(s).
Less briefly:
1. Set the layer combination, scale, model view options, and dimensions. Create views. I would make a clone of the Stories folder, called 'Plumbing', with an ID of 'P'. The clone should go in the CDs view folder. It isn't mandatory to rename the views, since our plans don't use automatic titles, but you can rename them if it helps you.
Now you have a plumbing view for each story.
2. Layouts: Duplicate the A1 Plans subset: Within the CDs subset, drag the A1 Plans folder while holding down Option. Select the duplicate. At the bottom of the Navigator, under Properties, change the ID from 'A1' to 'P'. Change the name to 'Plumbing'. Click the Settings button. Uncheck 'Add prefix for this Subset'. (The layout IDs will end up P0, P1, P2,...)
Open the subset so you can see the layouts. Delete the Roof Plan. Add the word 'Plumbing' to each layout name; e.g., 'Basement Plumbing Plan'. (This name will be displayed in the title block.)
Open Drawing Manager. Click the 'Placed To' Heading to sort the list by layout ID. Find the P layouts. These drawings are still the A1 plans, because the layouts were copied. Select each one and use 'Link To' to link it to the new plumbing view for that story.
Now you have 'P' layouts with plumbing plans on them.
3. Publisher: This is how you add layouts to a Publisher set. But you don't need to do this to add items to the CDs. You'll see why in a minute.
Interlude: Open the Organizer. Set the left panel to Layout Book and the right panel to Publisher. Choose the Publisher set you want to add to.
Highlight the Plumbing subset folder on the left, and the top folder of the publisher set on the right. Click the Add Shortcut button.
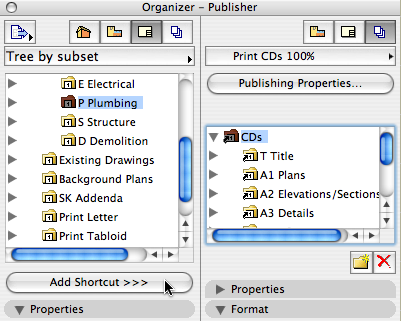
Note: You have to add the folder in this way in order for it to be a live, clone-type folder. If you add layouts to the subset, they get added to the Publisher set automatically. (Notice the arrow on the folder icon.) If you drag the subset over, you get only the layouts in the folder at that time.
But: Notice that the CDs Publisher sets consist of a clone of the entire CDs layout folder. So when you added the layouts, you were adding the publication items automatically! It's already done. Schematics and Existing Drawings work the same way. Not all Publisher sets are so lucky, so I wanted to tell you the true process.
Summary: You already have the stories, the layers, the layer combination, the model view options. Mash that stuff together to make views. Copy the plans you have, and switch the drawings for the new views. Add the new layouts to the Publisher sets. Never mind!
Nothing to it.