Location: 04 Masonry / Chimney & Fireplace
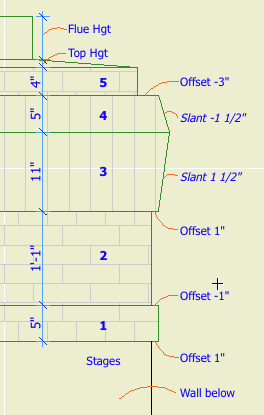
The chimney proper is built from walls and slabs. At the top things tend to get weird, with a lot of zigging back and forth. This object should help with that, as well taking care of ending the flues.
Executive summary: Build up a stack of up to eight stages of masonry. The stages can be offset to each other, and can slant as needed. The flues are cut through the stack. Flues can be arranged automatically or moved around.

You can have up to eight, and you can have none. (Let me know if you need more.) Each stage is turned on by setting its thickness to greater than zero. Stages must be built in order. If a stage has zero thickness, those following it are not available.
Each stage has parameters for Thickness, Offset to Last, Slant, Material, and Section Fill. Offset is the difference in size from the top of the previous stage. (The first stage is offset to the objects length and width, which will match that of the chimney elements below.) Slant allows the stage to get narrower or wider toward the top; positive values increase size, negatives decrease. A slant of zero is vertical.
The first stage should always be offset; if it's flush with the chimney, you should eliminate it and make the chimney (walls or slabs) taller.
Quantity between zero and four. I think the zero case would be quite rare, but there it is.
All the flues will use the same Material and Section Fill parameters.
Flue dimensions can Match, or they can be set independently.
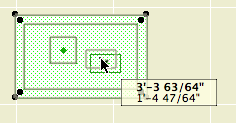
Flue Arrangements: Both Auto arrangements line up the flues down the middle of the chimney. Auto Max spreads the flues as far as possible between the ends of the object, staying within the Minimum Chimney Thickness. Auto Min puts the flues as close together as possible in the middle, with the Minimum Flue Spacing between them. Customize allows you to move the flues around in plan using the editing hotspots.

Note that the object doesn't check if the flues fit; it's up to you to make sure the whole thing is big enough.
Flue Height Above Chimney is the distance the flues stick out the top.
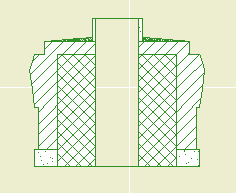
The Flue Thickness in Section option shows the flue thickness all the way through the chimney. Otherwise, the flues are simply sitting on top of voids cut directly through the chimney parts. You will usually have this parameter off in order to line up better with the flues in the chimney below. As discussed here, it is nigh-impossible for the flue object to show its thickness. If it ever becomes possible, the chimney top will be ready.

Section only. Obviously. There's a big blob of something, probably CMU, in the center of the chimney, cutting through all the stages except the top one. The Veneer Thickness controls how much of the stages remains on the outside.
Sloped parging on top of the last stage. The top slopes up to the Top Height, forming a plateau which traces the flue outlines. The top gets its own material and section fill. The top can be on even if all the stages are off.
Related:
Chimney/Fireplace 1: Fireplace in Plan
Chimney/Fireplace 2: Chimney in Plan and 3D
Chimney/Fireplace 3: Flues
Chimney/Fireplace 4: Hearth Structure
