On Land

Environment Information
At Rill Architects we run ArchiCAD on macOS. If you work at Rill, this is your stuff. If you don't, but you work in ArchiCAD, you may find something interesting. Anybody else, I don't know.
RSS
Tips Archive
Window slabifying slabs

A slabified window is easy, considering it's a window and windows are hard. Build up a few slabs of varying thicknesses and IDs and you're done.

But it's tedious to set all the thicknesses and IDs, right?

How about a module of slabs preset to the proper settings? Then it's just a matter of option-clicking and magic-wanding each part.

You can arrange the slabs so they resemble a window section to help you remember what's what. And, yes, you can call out the parts with text, too, right.

I put one of these for a 2x6 wall at 3 Resources / Modules / Window Slabify.mod. Other wall types would vary but it's a start.

Rectangle Profile
Pretty tricky
This is so trivial/obvious that I hesitate to point it out.

You can't rotate a conventional beam element about the long axis. (Why? Dunno.) But you can rotate profile beams. So you just need a rectangular profile.

But if it's so obvious, why isn't there such a profile in the default templates, among the faux-proof-of-concept distorted steel shapes? And why wasn't there one in our templates until yesterday? Dunno that either.

LCF Folder
Archicad 10 offers a new all-in-one library file format, the Library Container File or LCF. In Archicad 9, you could use a PLA archive file as a library. LCFs are pure library stuff, with no model space or attributes.

It is allegedly faster to load the libraries as a single large file than from folders full of folders full of individual objects. But I must say in my informal testing I haven't observed a dramatic difference among loading library folders, PLAs, and LCFs.

In addition, there's at least one characteristic of LCFs (and archives) that is disadvantageous. You can't save objects into them. So no new objects and no editing. (You could view this as an advantage from a standards point of view; nobody can mess anything up.)

In other words I considered using an LCF for the Rill & Decker Standard LIB but decided against it. There's no change in everyday library management.

But! There's a huge advantage to the LCF in one specific case: Copying libraries to a flash drive to take them home. The R&D library is about 15MB. Copying its 1300 or so items to a USB 2.0 drive takes over two minutes. Copying the same library as a 15MB LCF takes, drum roll, three seconds.

It also takes the guesswork or other syncing strategies out of keeping your home copy of the library up to date. Just bring the LCF home and overwrite the old file.

So I'm providing the library as an LCF for this purpose. The file lives at 2 Libraries / Library Container Files. I will do my best to update it when anything important changes. This is pretty often, so make sure you check it regularly.

You still need to manage project libraries manually.

When they mashed up PlotMaker with Archicad, they had to make views-in-layouts into proper elements, rather than flaky PM things. So we have the Drawing element, which can be edited as a polygon, assigned favorites, and given a marker, all of which makes the mashed up AC views-in-layouts much more pleasant than their ancestors.

But drawings aren't just for views; You can use them for PDFs. They're not just for layouts; you can place them in any model window.

DWG Drag
And finally, you can use them to place DWGs. Rather than opening or XREFing the DWG, you can drag and drop it from the Finder directly into a model window, where it becomes a drawing. If you just need a DWG for tracing or reference, this is the way.

When you drop the drawing, the only question you have to answer concerns the units. Use 1 inch. If the drawing is 12 times too small (I think that's how it works), drop it again and choose 1 foot.

A few other points:

• A big advantage of the drawing method is there's no layer contamination.

• Drawings placed in this way can be updated, just like view drawings, and will appear in the drawing manager.

• The drawing will come in with the default settings of the drawing tool (though there will be no title). As for the pen set, use '*Layout', which is overwhelmingly black and works for most DWGs.

• If you're placing DWGs for use in output, more pen management is likely in order, which is another topic.

• Tip: Put the drawing on a remote story and set that story to ghost. Now you can work normally without accidentally selecting the DWG.

There are the layer combinations for work and the layer combinations for output. In the past, the output LCs have had all their layers locked. The only reason for this was make clear to the user that they're not in a working combination. Not a critical point but there it is.

Now there's a stronger reason to have the layers unlocked in output LCs. In AC10, you can right-click on a drawing and choose 'Open source View' to, right, open the source view. (In AC/PM9, this command existed but it never worked as far as I could tell.)

Open Source View
If you are viewing a drawing and see something that needs fixing, you can open the view and get right to it. So the layer locking should get out of the way.

In the architectural LCs, all the visible layers are unlocked. In the specialized plans (electrical, e.g.), only the special layers are unlocked.

A subtle but powerful feature tweak in AC10 is the addition of the 'Previous' option for ghost story display. Very simply, it shows the last story you were on as ghost.

Now you can go back and forth between the basement and first floor, e.g., while always keeping the other story in sight.

Here's a somewhat lateral tip. Use previous to show either the story above or below without using the Stories or Go To Story dialog at all. To show the story above as ghost, just go up and then immediately down (Cmd+6, 5). For the story below, down then up. Very quick, and habit-forming.

It is not possible to delete the entire Favorite list at one time. You can only delete them one at a time, which, if you have a lot, no thanks.

But you can write over the entire Favorites list with another list. If this list happened to have, say, one item on it, well that would be pretty easy to delete.

We have the Favorites file 'Blank.prf' for this purpose. It resides at 3 Resources / AC / Favorites. It consists of a Favorite for the Hotspot tool, Archicad layer, pen 10, that's it.

On the flyout on the Favorites palette, choose 'Load Favorites', and open the Blank.prf file. You will get a dialog offering to merge or replace the current list. You want to replace. (Merge adds the new list to the old.)

Delete that hotspot fave and you've got your blank slate.

Why delete the Favorites? It helps clean out attributes. Attribute Manager will report that an attribute is in use if it is part of a Favorite. With no Favorites, it's one less place to look before you're sure you can delete something.

And of course you can clear them temporarily. Save the Favorites you are using, clear them, do whatever you need to do, then load your saved list back.

As long as I can remember, we've used a polygon wall for a fireplace, with a 3D-only wall or slab above to take the chimney to the ceiling. This method has been developed pretty far.

This new method isn't going to give you the 1" chimney section for CDs, but for schematics, it feels a little simpler.

More»

This is obsolete as of Archicad 15 which brought new Renovation.

MacDonald is a long-completed new home project. I don't know how long, but the important thing is that it's an AC7 project. We are reviving it for the purpose of some interior renovation. Naturally, we want to use the data we have. There are a few issues in working on a project of this vintage:

• All of the elements on new (.N) layers need to be treated as existing.

• The libraries.

• There's a couple of minor pen issues, to the extent that pen issues can be minor.

• The project is full of CD-phase annotation. All we want is the geometry.

More»


I built this newel out of ordinary stuff. Crown and baseboard objects, walls, a mesh for the top. In plan, there's a square fill. All the elements go on the layers they would if placed directly in the project. The model parts are on A Stair3, and the fill is on A Stair Rail.

The newel is all alone in a separate project file. I hotlinked it into the main house project, and copied it around. There are eight of them.

It is easier to maintain than if I had saved the whole thing as an object, which was my first idea.

I am also using the newel PLN to generate the section and elevation details of the newel. Can't do that with an object. Remember you can have drawing links to different projects.

When I needed a half-version of the newel: I created yet another separate, blank project, and hotlinked the newel into that too. Then I placed a big slab and SEO-subtracted away half the newel. Then I realized that the plan fill was still whole, which is no good. I broke the hotlink, which leaves ordinary elements. (So I could have simply merged it after all.) I adjusted the fill to cover only half the newel. Then I hotlinked the half-newel project into the main house as above. (If I change the whole newel, I'll have to do the half over. Not ideal, but the alternatives aren't either.)

Something to think about...

I've added an 'Alternates' folder to zTemplate folder, in 1 Design. It should have been there before, sorry.

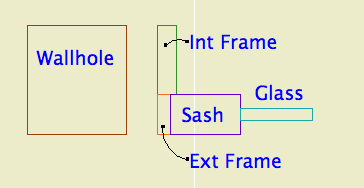
It gives me an opportunity to discuss alternate handling, or at least to give you one case study. Vassos, although it's under construction, has occasional lapses into design development. The clients were interested in seeing alternatives for one part of an elevation. We offered two, which forked into three.

I saved a copy of the project for each alternate, with a descriptive name, in that Alternates folder. I developed the model for each alternate. We wanted to present a perspective and an elevation for each choice. Since the alternates are in separate files, and all the alternates are separate from the main PLN, it's easy to simply use the views you already have. You can't mess anything up.

To present the choices, I created a new subset in the main layout book. There's no reason to create separate 'books for each. Within the new folder, there are two layouts for each alternate. I hooked the new layouts to the 11x17 Master. Then I imported the perspective and elevation views from each PLN.

Once the decision had been made about which version to use, it was time to begin treating that scheme as the real project. I renamed the main PLN, which had been untouched, with a date, and moved it to the '6 Old Files' folder. I saved-as the anointed alternate with the original name of the main PLN, at the top of the project folder. This means the layout book never knows anything happened. If you change the name of the project, you will need to re-link your views.

In the end, we have three alternate PLNs set aside, the pre-alternate version of the project intact, and the layout book not disrupted. And a compact record of the alternates' presentation. Pretty good.

In this case I was fortunate that, since the project was 'done', there was no other work going on anywhere. Presenting alternates in the DD phase is trickier, especially if the design decision is slow in coming. If you need to keep the main project moving while the alternates are being developed, it is better to merge the chosen alternate elements back into the main project.

I've added a new layer combination to the templates, 'Stretch House'. It's intended to help when marquee-stretching the whole project. It simply shows and unlocks everything building related, while hiding the section markers and everything site-related. I hope you find it useful, or can at least ignore it.