On Land

Environment Information
At Rill Architects we run ArchiCAD on macOS. If you work at Rill, this is your stuff. If you don't, but you work in ArchiCAD, you may find something interesting. Anybody else, I don't know.
RSS
March 2005 Archive

Location: 01 General : 1 Graphic Symbols

I actually updated this about 3 months ago. The only differences from the previous version are the addition of the Z shape option, and the ability to flip the direction in plan, using the hotspot above (UP) or below (DN) the direction text.


Location: 06 Wood and Plastic / Railings & Stairs

Here's a new railing object. It should be the only (simple) one you need, since it can be interior or exterior, and level or sloped.

More»

The Work Environment offers the ability to export the keyboard shortcuts as a web document. So why not. Here it is. This link will stay on the Standards section of the sidebar over there on the left. If any of these don't work for you, you can import the current shortcuts from 3 Resources / AC / Work Environment / Rill [version] / Shortcuts.

A Flue is for modeling chimney flues. It shows in plan and section. In section, the layer should be wireframe to show the flue void. In general use, elements on the A Flue layer will be subtracted from each part of the Fireplace/Chimney. The templates have a new layer combination, 'View Flues', which shows the flues solid inside the wireframe chimney.

A Chimney3 is for chimney parts that should not show in plan. Formerly we used A Wall Hi for this purpose. Putting these elements on their own layer allows you to show an axonometric of just the chimney. The templates have a new layer combination, 'View Chimney', which shows the chimney solid by itself. You can use a marquee to create a cutaway axon to show the flues.


Elevate, v. syn: lift, hoist, raise, pull up...

Now that you have a fireplace, you'll likely need a chimney.

More»

Location: 04 Masonry : Chimney & Fireplace

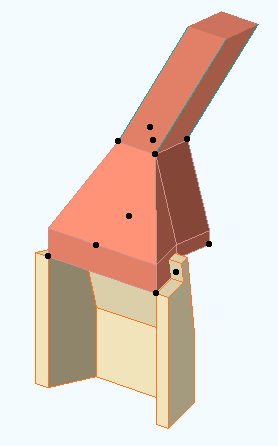
The missing link between Firebox JM9 and Flue JM9. You could use a mesh and a slab in its place, but why?

The smoke chamber fits on top of the firebox. The width, depth, and firebox Back width should match the Firebox Lining object. The flue width and depth should match the Flue object. The front of the flue lines up with the back of the firebox. You can't change this.

The throat height is the distance from the top of the firebox to the start of the smoke chamber slope. The shelf depth is the distance from the slope start point down to the bottom of the smoke shelf, behind the firebox. The throat adjustment is for hiding the edge of the smoke shelf inside the top of the Firebox Lining. (Very easy to see in section image below the fold.)

The object should be placed on the layer A Flue. Model it with a visible, white-printing pen such as 40. For the material, use the material you want to see inside the flue. The Flue Pen should be a printing pen, to show the start of the flue above.

More images below the fold.

More»

Everybody knows this, right?

Do not use the "Cloud" objects in the Archicad library. They are the worst objects in the world. Update: I killed these with my bare hands. They're gone and you needn't fear them any more.

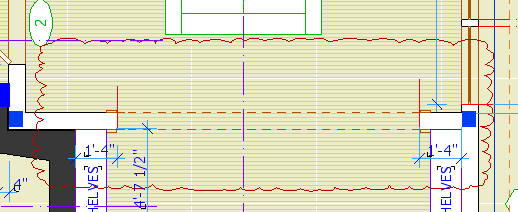
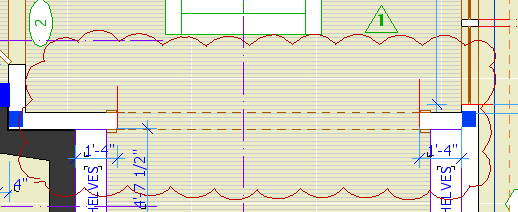
Clouds should be drawn with a closed spline using the "cloud" linetype. The only glitch is that sometimes the cloud will be inside out when you are done. If this happens mirror the cloud, or, if the shape is non-mirror-friendly, draw the spline again, in the opposite direction. Sometimes the spline doesn't quite close. Pretend not to notice.

For the triangle, use the object Character+Shape JAM8 Shape Tag JM9. The number comes from the ID.


Bad cloud. Looks like a chunk of foam rubber from an AirTran pillow. Also missing marker.


Pretty cloud, reminds one of heaven.

Attention: The only reason to plot instead of print is to send drawings out, until the print shops learn to print our PDFs without mangling them. DO NOT PLOT for archiving, or for printing in-house. PLTs look pretty bad when printed here. This method is offered as an emergency backup for when we run out of paper, or to print more sets than we can comfortably collate & staple ourselves.

I look forward to informing you that this technique is no longer needed.

More»

Current naming standards. Still very boring.

These rules aren't set in stone, but if we all stay near the rules we all stay near each other. Like all standards, they work MOST of the time. If a situation is addressed by the standards, save your creativity for the projects.

More»

Every drawing or set we give to someone else should be archived as a PDF in the project folder at 2 Output : PDF Archive. This is for convenience and our own protection.

Archives should be named with the date, and a description if the set is for a specific purpose, such as a permit set. Example: Somebody 2005-03-11 Permit.PDF.

In OS X, PDFs can be created from any print dialog by clicking the Save As PDF button.

PDFs saved in this way will be single files with all the printed sheets in them.

You can use PDFs to send drawings to consultants, if they just want to view the drawings and don't need CAD data. If they need actual drawing stuff, you need to send DWGs.

You can view drawing set PDFs using Adobe Reader or Preview, the OS X PDF viewer. Preview is generally better.

For large format output we use that enormous, hot, 16-amp-pulling thing in the middle of the office.

Here is how to install the plotter on your machine.

In PlotMaker, Page Setup. Go to File -> Page Setup. (Not Plot Setup!) At "Format For", select "WINPRINT 192.168.1.29". Select the Paper Size from the next pulldown. 18x24 is ARC C. 24x36 is ARC D. 30x42 is 30X42, not ARC E. (11x17 should be printed on the "small" printer.) To summarize, the only sizes we use are ARC C, ARC D, and 30x42.

In PlotMaker, Display Options. Make sure the fills are set to display "All Vectorial."

If you plan to print "Selected in Navigator", see below, highlight the layouts you want to print.

To print, issue the Print command by File -> Print, Cmd+P, or a toolbar button. Make sure the WINPRINT printer is selected. Set the number of copies. Click Copies & Pages and choose PlotMaker. Select what to print. Don't check "All Colors to Black."

All of the above can be automated by using Publisher, which is a really good idea.

When you print, the print job actually goes to the PC [insert snark] next to the plotter. Depending on the size of the job, it can take a while for the job to process. If you bring the PlotBase application forward, you should see your job at the bottom of the list. It will read Preparing Data, Pending, then Plotting. To reprint a job, right-click on and choose Status -> Pending. I know, real intuitive. The last 50 jobs are saved.

Plotbase troubleshooting: Make sure the "Play" button is pressed (gray). Make sure the "reader" is on (Configuration Menu).

Once the sheets start coming out, it's quick, seven D sheets a minute. Right now we don't have any facility for catching the sheets as they come out. You can grab them one at a time, or pick up the pile at the end. We'll keep working on it. Also not well-solved: binding.