On Land

Environment Information
At Rill & Decker Architects we run ArchiCAD on Mac OS X. If you work at Rill & Decker, this is your stuff. If you don't, but you work in ArchiCAD, you may find something interesting. Anybody else, I don't know.
RSS
Tips Archive

All Entries | 1 | 2 | 3 | 4 | 5 | Older »

Pen 50 is the poché pen. It is gray (80% +/- I think) in model and layout pen sets. It should be the background color of any cut fill in new construction. (Existing condition elements are white.)

That said, one of the advantages of pen sets is having black+grayscale output while the much more colorful model pens help you stay organized. So we have an alternate poché pen, #70, which is sort of tealy in model but looks exactly like pen 50 in layouts.

Elevator walls
The original intent for this pen was to distinguish multi-story walls (then new in Archicad 10) from their single-story brethren. I don't use multi-story walls as a rule, but I like them for elevators. In any case, the color difference reminds the use that when you edit this element there will be consequences on remote stories.

Lately I've been using them for other distinctive conditions.

Elevator walls
Modeling walls. For example, walls on the layer A Wall3 are usually needed to get a dormer to close in model. The color reminds you they don't inject their misleading selves into the output plans.

Profile Patch

Complicated 'patching' profiles. The color makes clear where the profiles meet the conventional elements.

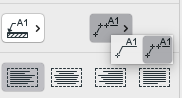
Every viewpoint has a name and an ID. The name is important and is often used for output. The ID is never used for output, but wherever possible we use the ID to help organize the project map and view map.

Info Box name/ID
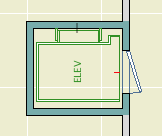
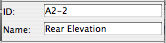
For viewpoints with with a marker, the name and ID appear in the Info Box and settings dialog. This applies to section, elevations, details, and interior elevations. (And worksheets, in theory, though in our usage worksheets usually don't have markers.)

Properties in Navigator
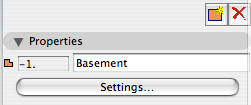
For all viewpoints, the name and ID appear at the bottom of the Navigator under the Properties heading. Viewpoints with fixed IDs, such as stories, will have the ID field in gray.

The behavior of IDs varies among the viewpoint types, so here's a cheat sheet.

Story IDs
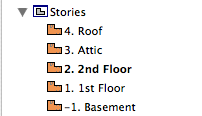
Stories have unique, fixed IDs based on the order of stories. They are ugly. We ignore them.

Section IDs
Section and 
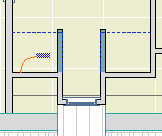
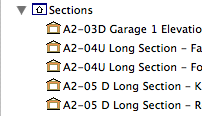
Elevation IDs are created by the user, and they need not be unique. Sections and elevations should have an ID roughly corresponding to their sheet number. Building elevations and sections get A2-1, A2-2, etc., and wall sections get A3-1, A3-2, etc. For sections, add a letter to indicate the direction the section is facing. Don't put the direction in the name. For 'Junk' sections, used for modeling support and not for output, the ID should be xn where n is a number. (Yes, junk sections should usually be sections, not elevations.) So you end up with a section list of output viewpoints at the top, followed by all the junk.

Interiors IDs
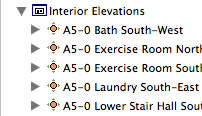
Interior Elevation IDs should start with A5. I like to use the ID to sort the interiors by story: Basement is A5-0, first floor is A5-1, etc. Like the sections and elevations, the actual output sheet may differ. The sorting is to help you know where to look in the view map.

Detail IDs
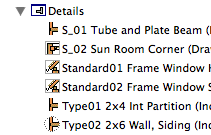
Detail IDs need not be unique. (In AC10 and earlier, they had to be.) Still, it's a good habit to make them distinctive. I find it helpful to use the detail ID to give the 'category' of detail. For example, a bunch of eave details will have IDs of Eave01, Eave02, etc. The assembly type details have Type01, Type02, etc. Structure detail IDs start with S_ followed by a number. For all details, the name should be presentable for the automatic drawing title.

Worksheet IDs
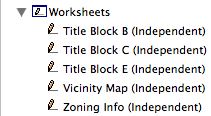
Worksheets are a new, mostly redundant viewpoint type in AC11. We could easily live without them, but since they exist, we park all the straggly non-detail drawing things there. There aren't enough worksheets in a typical project to worry about sorting the list, so I recommend leaving the ID blank and just using the name.

Schedules, too, aren't abundant enough to sort. Leave the ID blank.

Cameras and paths have unique IDs that can't be changed.

Summary: Viewpoint IDs are not used for output, so use them to help sort the lists. Names are used for output: Use the name you want to see on the paper.

The IDs that do matter for output are those of the layout book items; subsets, layouts, and drawings.

Drawing IDs are usually generated by the layout, either by the grid or the order of drawings in the layout book tree.

Layout IDs are usually generated by the subset.

Subset IDs are set by the user, and the subset ID becomes part of the layout ID.

Views also have IDs, but they should typically inherit the viewpoints' IDs, so the lists will appear the same to us. All view IDs can be customized or set to 'None', but you can usually just leave them be. In the templates, I have deleted all the IDs for story (plan) views, because stuff like "-1. Basement" looks idiotic.

What? I know how to open a file! Jeez!

OK. Just in case:

Always open AC files via right click -> Open With or by dragging the file to requisite AC icon on the dock. I do the dock thing; I'm just not a context menu person usually.

Most important, don't double-click PLNs. Double-clicking will only give consistent, predictable results if you have exactly one copy of AC on your machine.

When you install a new version of AC, as you soon will in the form of 11, that version becomes the default application for opening PLNs. So you double-click your AC10 project, it opens in 11, you don't notice the difference because there isn't much, you save it, and next time you try to open it in 10 it doesn't work. (Yes, backsave. Real convenient.)

Always keep current versions of AC on the dock. Even if you use the right-click method, the dock gives you visual confirmation that the right application is being used.

Graphisoft gives poor support in this area, by making the icons identical and naming each version, precisely, "Archicad".

Double-clicking files is one of those 'automatic' things that's great if you can trust it, but when it's not predictable it makes trouble. It's not just AC either, recently my .docs started opening in Pages for some reason.

What about that 'Change All' under Open With in the Get Info window? That fixed my .doc issue, but it doesn't reliably assign the right 'Archicad' version.

So, right-click or dock. If you have a bad habit here, change it now before 11 starts getting on your nerves.

Update re app icons: Mr. Briggs to the rescue.

11 Icon

Homeworkers: When's the last time you took home the office Library Container File?

The library is always changing and the LCF is updated every Monday at the very least.

Window slabifying slabs

A slabified window is easy, considering it's a window and windows are hard. Build up a few slabs of varying thicknesses and IDs and you're done.

But it's tedious to set all the thicknesses and IDs, right?

How about a module of slabs preset to the proper settings? Then it's just a matter of option-clicking and magic-wanding each part.

You can arrange the slabs so they resemble a window section to help you remember what's what. And, yes, you can call out the parts with text, too, right.

I put one of these for a 2x6 wall at 3 Resources / Modules / Window Slabify.mod. Other wall types would vary but it's a start.

Rectangle Profile
Pretty tricky
This is so trivial/obvious that I hesitate to point it out.

You can't rotate a conventional beam element about the long axis. (Why? Dunno.) But you can rotate profile beams. So you just need a rectangular profile.

But if it's so obvious, why isn't there such a profile in the default templates, among the faux-proof-of-concept distorted steel shapes? And why wasn't there one in our templates until yesterday? Dunno that either.

LCF Folder
Archicad 10 offers a new all-in-one library file format, the Library Container File or LCF. In Archicad 9, you could use a PLA archive file as a library. LCFs are pure library stuff, with no model space or attributes.

It is allegedly faster to load the libraries as a single large file than from folders full of folders full of individual objects. But I must say in my informal testing I haven't observed a dramatic difference among loading library folders, PLAs, and LCFs.

In addition, there's at least one characteristic of LCFs (and archives) that is disadvantageous. You can't save objects into them. So no new objects and no editing. (You could view this as an advantage from a standards point of view; nobody can mess anything up.)

In other words I considered using an LCF for the Rill & Decker Standard LIB but decided against it. There's no change in everyday library management.

But! There's a huge advantage to the LCF in one specific case: Copying libraries to a flash drive to take them home. The R&D library is about 15MB. Copying its 1300 or so items to a USB 2.0 drive takes over two minutes. Copying the same library as a 15MB LCF takes, drum roll, three seconds.

It also takes the guesswork or other syncing strategies out of keeping your home copy of the library up to date. Just bring the LCF home and overwrite the old file.

So I'm providing the library as an LCF for this purpose. The file lives at 2 Libraries / Library Container Files. I will do my best to update it when anything important changes. This is pretty often, so make sure you check it regularly.

You still need to manage project libraries manually.

When they mashed up PlotMaker with Archicad, they had to make views-in-layouts into proper elements, rather than flaky PM things. So we have the Drawing element, which can be edited as a polygon, assigned favorites, and given a marker, all of which makes the mashed up AC views-in-layouts much more pleasant than their ancestors.

But drawings aren't just for views; You can use them for PDFs. They're not just for layouts; you can place them in any model window.

DWG Drag
And finally, you can use them to place DWGs. Rather than opening or XREFing the DWG, you can drag and drop it from the Finder directly into a model window, where it becomes a drawing. If you just need a DWG for tracing or reference, this is the way.

When you drop the drawing, the only question you have to answer concerns the units. Use 1 inch. If the drawing is 12 times too small (I think that's how it works), drop it again and choose 1 foot.

A few other points:

• A big advantage of the drawing method is there's no layer contamination.

• Drawings placed in this way can be updated, just like view drawings, and will appear in the drawing manager.

• The drawing will come in with the default settings of the drawing tool (though there will be no title). As for the pen set, use '*Layout', which is overwhelmingly black and works for most DWGs.

• If you're placing DWGs for use in output, more pen management is likely in order, which is another topic.

• Tip: Put the drawing on a remote story and set that story to ghost. Now you can work normally without accidentally selecting the DWG.

There are the layer combinations for work and the layer combinations for output. In the past, the output LCs have had all their layers locked. The only reason for this was make clear to the user that they're not in a working combination. Not a critical point but there it is.

Now there's a stronger reason to have the layers unlocked in output LCs. In AC10, you can right-click on a drawing and choose 'Open source View' to, right, open the source view. (In AC/PM9, this command existed but it never worked as far as I could tell.)

Open Source View
If you are viewing a drawing and see something that needs fixing, you can open the view and get right to it. So the layer locking should get out of the way.

In the architectural LCs, all the visible layers are unlocked. In the specialized plans (electrical, e.g.), only the special layers are unlocked.

A subtle but powerful feature tweak in AC10 is the addition of the 'Previous' option for ghost story display. Very simply, it shows the last story you were on as ghost.

Now you can go back and forth between the basement and first floor, e.g., while always keeping the other story in sight.

Here's a somewhat lateral tip. Use previous to show either the story above or below without using the Stories or Go To Story dialog at all. To show the story above as ghost, just go up and then immediately down (Cmd+6, 5). For the story below, down then up. Very quick, and habit-forming.

It is not possible to delete the entire Favorite list at one time. You can only delete them one at a time, which, if you have a lot, no thanks.

But you can write over the entire Favorites list with another list. If this list happened to have, say, one item on it, well that would be pretty easy to delete.

We have the Favorites file 'Blank.prf' for this purpose. It resides at 3 Resources / AC / Favorites. It consists of a Favorite for the Hotspot tool, Archicad layer, pen 10, that's it.

On the flyout on the Favorites palette, choose 'Load Favorites', and open the Blank.prf file. You will get a dialog offering to merge or replace the current list. You want to replace. (Merge adds the new list to the old.)

Delete that hotspot fave and you've got your blank slate.

Why delete the Favorites? It helps clean out attributes. Attribute Manager will report that an attribute is in use if it is part of a Favorite. With no Favorites, it's one less place to look before you're sure you can delete something.

And of course you can clear them temporarily. Save the Favorites you are using, clear them, do whatever you need to do, then load your saved list back.

As long as I can remember, we've used a polygon wall for a fireplace, with a 3D-only wall or slab above to take the chimney to the ceiling. This method has been developed pretty far.

This new method isn't going to give you the 1" chimney section for CDs, but for schematics, it feels a little simpler.

More»

All Entries | 1 | 2 | 3 | 4 | 5 | Older »