Turn on the Cover Fill to make the pieces opaque (White, pen 91). Useful for roof plans of a pergola. Stories below will not show the fill.

Turn on the Cover Fill to make the pieces opaque (White, pen 91). Useful for roof plans of a pergola. Stories below will not show the fill.
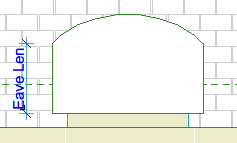
I Added an 'Eave Length' parameter to the plan options. This allows you to show a straight eave before the curve begins:
I also made the plan fill a cover fill, so it will respect the display/model view options.
Location: 01 General / 1 Graphic Symbols
A custom drawing title object for plans only. It's very similar to the old Drawing Title RND 9a.
As you know, in AC10 we use the new automatic drawing title marker objects. All drawings except full size plans should use the automatic titles.
Why do plans still use an object? Because we want the titles to stack through the sheets, and the best way is the multi-story feature of conventional objects. There's no easy way to align elements across layouts.
Since we're sticking with the object for plans, and not using the object for anything else, I decided to optimize the object for plans, so here we are.
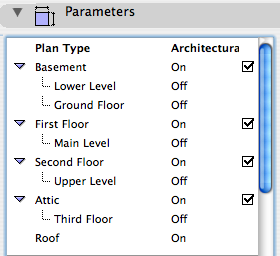
In the templates, there is one of these guys for each plan. In setting up the project, you need to set up the plan titles. For example, turn the attic off if there's no attic. The best way to do this is all at once: Turn all the note layers on, select all the title objects, and change their story setup.
The different names for a given story are all hooked together, so if you turn 'Main Level' on, 'First Floor' will switch off.
Place the object on the lowest story that is in use. If that's the basement, turn 'Basement' on. If not, turn it off and 'First Floor' will take its place. Etc.
Location: 01 General : 1 Graphic Symbols
Replaces Elev Marker JM9. It's been bi-axially flipped around to make it more standard. The circle gadget is on the left, where it belongs, and the description is on the top, where it belongs.
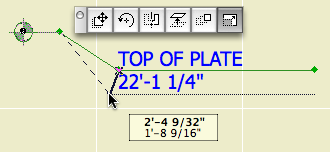
First spot: beginning of bend. Second spot: End and depth of bend. End spot: depth of bend and length of object.
The length can be input directly with the Length (Paper) parameter. 2" is standard.
Archicad 10 provides automatic story levels in section, but you'll still need this object to call out other levels.
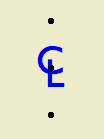
If you're local (in the same room), this won't make much difference to you. I have generalized the old CL symbol so I can offer it for download on the new Archicad Talk Object Depository. This means I'm enabling flexibility which I, and the locals, don't need.
For everyone else. This is your basic CL symbol, since most fonts don't have it. You can change the font and size, and apply bold formatting. Now I'll copy and paste the helpful commenting from the 2D script:
!! The default font is Arial, since that
!! seems to be the default font of the
!! universe. If you have Gill Sans, use
!! that. It looks best IMO. It's the font
!! in the preview image. Full disclosure:
!! I'm not into the faux-hand lettering
!! thing.
!! If you put in a custom font, and you're
!! graphically particular, you might need to
!! adjust the Text Offsets to get the right look.
!! The top & bottom hotspot offset is
!! proportional to the point size. I don't
!! know what happens with very large sizes;
!! you might need to adjust 'spotY' as well.
!! Personally, I never mess with the size; I just
!! put it in for completeness.
!! Why aren't the offsets parameterized?
!! Because you shouldn't change them for
!! specific instances. They should be standards
!! that are invisible in regular use.
Placement tip: Set the object to insert by the top or bottom hotspot, and use the Rotated geometry method of the object tool.
Download (AC9)
Location: 01 General / 1 Graphic Symbols
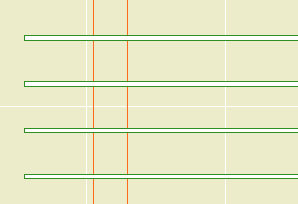
An improved drawing list object, featuring any number of columns. You can also turn the heading off entirely. I ditched the vertical lines.
Two things you need to know. We are redesigning the standard cover sheet, and we have a couple of projects where the drawing list needs to be three columns in order to fit in its box. And, in 10, we have automatic drawing lists, so you're going to use the object only in unusual situations. (Too bad, it's one of my favorites.) With the auto list, the heading needs to be independent for technical reasons. For compatibility with the auto list, and the new cover sheet, we need to be able to turn the heading off.
All of this will make more sense when you actually start using 10. In the meantime, if you need to spread the drawing list over eight columns, go ahead.
Update: The 10 version is better.
Location: 01 General / 1 Graphic Symbols
(Any non-local people who would like to try it out, it's here.)
The elusive masking cutline. Then I started adding a bunch of other stuff, hence the strikethroughs in the title. Here's its simplest form:
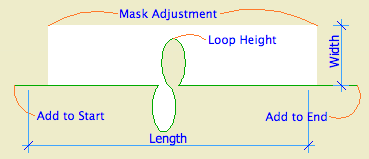
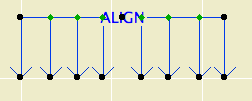
The alignment symbol. Slightly improved from the JAM8 version: You can have more than two arrows, up to a total of eight. That should be enough. For the extras, you can turn on Equal Spacing, or locate each one individually.
Location: 06 Wood & Plastic / Railings & Stairs (I'm thinking about moving it, since it's not really a fine detail-type thing any more. More like a missing tool thing. Not to mention, it could be concrete. I really wish the object browser could handle aliases. As for now, there it lies.)
UPDATE: Stair Body JM9a is exactly like Stair Body JM9, but I added the story-sensitivity behavior from Railing JAM9. See below.
In honor of the story cuts, I also added an integrated cutline. It is simplified, and it still doesn't mask, but I'm working on that.
I also (now how much would you pay) added a Cover Fill Pen parameter, which simply allows the object to be opaque.
All this is identical to the JM9 post otherwise.
(Teaser futuristic update-to-be: I am already mostly done with Stair Body JM10, believe it or not. The big deal there is intelligent interaction with the new Floor Plan Cut Plane. Pretty cool.)
A very basic (in a good way) flight of stairs. An incremental improvement on Stair Stringer JAM8. You can still use it as a stringer; just make it thin. I changed the name because I use it more often for actual stairs.
Sidebar: There's a stair tool (Technically, the StairMaker add-on), which you should never use. Then there's ArchiStair by the very capable and friendly Cigraph, which is like a good StairMaker, only better.
I recently used an ArchiStair spiral stair for which I was very grateful, but generally I am skeptical of full-service add-ons for highly detailed building parts. No matter how many options, configurations, and details are offered, you will soon run into a custom situation where the add-on doesn't quite make it.
I would rather have more, simpler, separate elements. (Well, no, I would rather have one element do everything by magic, but it's not realistic.) If you run into a freaky custom railing, you can focus on that without wrecking the whole stair. And: In design development, you can show just a simple stair, leaving the details for later, where they (the details) belong.
This is consistent with a general principle of Archicad's design, our workflow, and how projects are actually built. Big, chunky stuff comes first: Walls, slabs, roofs, the basic geometry of stairs. Fine detail comes later, and is applied to the big stuff: Trim, finish floors, newels and railings.
So: The Stair Body object is like a slab tool for stairs.
Another major basic-yet-detailed building part is the chimney. See what I mean? End sidebar.
Now we can talk about the object.
I found this 90% finished in the Ice folder, so I wrapped it up. The main difference is that the text expansion is now handled as a real number, consistent with the expansion feature of text in AC. The default expansion factor is 2.0.
Also: All the drawing names default to Title Case instead of ALL CAPS. Listen, all caps is played. It's a holdover from the hand-lettering days, which I barely remember. Nobody else in any print, design, or writing field uses caps all the time just because. It is hard to read. It looks like shouting.
Played.
Also, in the future (I'm optimistic), we will use automatic drawing titles. (Yes, they can be automatic in 9, but they're not parametric, and they don't cut it.) The name of the SE marker will be the name of the drawing. I'm not going to look at a Navigator full of CAPS all day.
Bury all caps, not praise.
This is a placeholder, I'll flesh it out eventually.
Exterior JAM9 is the new all-(most-?)purpose exterior door. It makes obsolete a large number of JAM8 doors, I don't know how many. Most of the 'basic' parameters (single/double, transom, leaf style, etc) which used to have separate door objects, are rolled into this one. Briefly, more later:
• Single or double
• Solid, french, or glazed-paneled leaf
• Side lights on either side, both, or not
• Transoms with various relationships to the door and side lights
The masonry and trim settings are very similar to the old doors, with greatly improved scale sensitivity in the profiles.
The JAM8 doors have been moved to 08a Doors/JAM8 Doors. They will continue to work. You 'shouldn't' need them. If a feature is missing in the new door, or if you encounter other problems, please let me know.
« Newer | All Entries | 1 | 2 | 3 | 4 | 5 | 6 | 7 | 8 | 9 | 10 | 11 | 12 | 13 | 14 | 15 | 16 | Older »