On Land

Environment Information
At Rill Architects we run ArchiCAD on macOS. If you work at Rill, this is your stuff. If you don't, but you work in ArchiCAD, you may find something interesting. Anybody else, I don't know.
RSS
Objects Archive

« Newer | All Entries | 1 | 2 | 3 | 4 | 5 | 6 | 7 | 8 | 9 | 10 | 11 | 12 | 13 | 14 | 15 | 16 | Older »

Location: 03 Concrete

A slab edge, trazezoidal or triangular. Placed under/adjacent to an element of the same fill, it will clean up in section. There was an 8 version of this, but I never wrote it up.

I don't recommend running these everywhere, but a little piece at the section cut helps the section a lot. One less thing to draw.

The goofy thing about this object is I put in a routine where you can edit the section profile in plan. (Turn on "Edit Shape in Plan".) Just an idea.


Edit in Plan


Section


Edit in Plan

These objects have detectable edges.

Cutline JAM9
Cab Blob JAM9
Wood Beam JAM9
Steel W Shape JAM9
Opening Slash JAM9
Stair Arrow JAM9
CenterLine JAM9
All the JAM9 trim objects (Crown, Rake, etc.)

"Labels are text blocks or symbols optionally linked to construction elements and 2D fills. Labels allow you to identify or comment elements or parts of your design." That's from the Archicad 9 Ref Guide page 343, and it's pretty succinct so I'll keep it. Here's more:

"You can use labels in two ways:

Independent labels manually placed using the Label tool.

Associative labels can be assigned automatically before the creation of an element or added to them later."

So there's two kinds. Independent labels are like regular objects, in that they do their own thing. There is a simple text label that's basically a text block with a leader, and it works OK as long as you don't go longer than one line. I (used to!) use these to call out structure in the sections and other simple things like that. They are a marginal improvement over plain text with an arc.

Associative labels are attached to elements, and can say intelligent things about them. They remain accurate as the data they represent changes. They can move when the element is moved. They are very cool.

(Why don't we use them yet? Because the underlying design of the label functionality is very poor, making it hard to figure out how they work, especially the differences between the two kinds. Now that I/we have them figured out, the actual making isn't hard.)

Frequently (Probably) Asked Questions follow. I'm focusing on associated labels, since independent labels are simple.

More»

Location: 01 General : 1 Graphic Symbols

A line, with a centerline marker at one or both ends. The line is detectable.

It is superior to a conventional line element since the tags say, "Hey here's a centerline", and an object can be displayed on multiple stories. Same reasoning as the CenterPoint object.

You can use it as a layout element on ! Layout.NP, or you can display it for output by placing it on a note layer. It's sometimes helpful for dimensioning to show centerlines, in which case they should be clearly labeled as such, so here you go.

This object doesn't take the place of the CenterLine Symbol, you still need that to mark dimension ticks. (Did you know? AIA standards say that dimension ticks on centerlines should be drawn as dots rather than slashes. Unfortunately, Archicad doesn't offer this ability.)


Location: 01 General : 3 Drawing Tools (FYI*)

This is a section tool marker, not a graphic section marker for display in documents. For that, you still use the object SectElevDetail Marker JAM.

It's very simple. The only parameter besides text size is the height of the flag.

Why bother? It's better than the default "basic section" in that it's easier to discern the view direction and the text flips the right way.

You might ask yourself, if we can create section tool markers, why do we still use the object? Because the scripting ability is still limited, and doesn't offer the facility to have the marker differ in shape from the cut.


* The location doesn't matter to the user, since you never select the marker from the library. A list of all the loaded section markers appears in the Info Box and Settings Dialog of the section tool. Also true of Details.

Centerpoint
Location: 01 General : 3 Drawing Tools

Basically a hotspot. Why not just use a hotspot? Since it's an object, you can show it on all stories, ensuring that the centers stack, and move together.

Also the astronomical symbol for Earth, if you ever need that.

Download (AC9)

NOTE: This is better.

Location: 01 General : 3 Drawing Tools

Two nice changes: There's a 3D version, and the interface for calculating height or quantity is improved.

More»

The defaults for the following parameters the the main title block object have been changed to their respective AutoText tags:

• Project Name

• Type

• Street Address

• City

• State

• Zip

The SK title block uses AutoText tags in the Project Name and Type fields.

That means, new placements of the objects will have these values unless you change them. That means, you need to fill in the book info for the tags to be interpreted correctly (recommended), or edit the settings to display the info the old way. (But why?) Current projects should not be affected, but feel free to set up your book info and use the AutoTexts if you like. If you are going to issue SK sheets, this will make it much easier.

The templates have been updated with the new defaults. The 'Starting a Layout Book' workflow procedure now includes adding the book info.

For new projects, you must set up the book info, or you get this:


Wow, that makes 'Somebody Residence' look positively elegant.

Location: 01 General/1 Graphic Symbols

An Sheet Size option for 'B 11x17'.

I have updated the templates with an additional detail window to hold the title block at this size. In the layout book templates, I have added a master layout for the 11x17 size.

To use 11x17 sheets in current projects:

More»

Location: 01 General/1 Graphic Symbols/

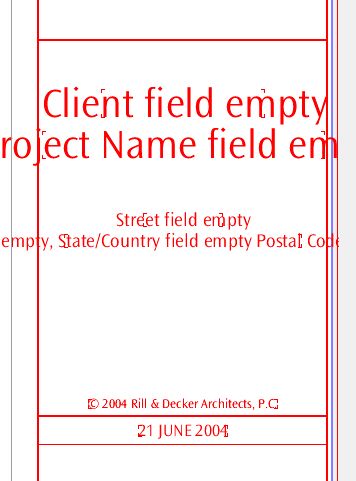
Description: A mask, frame, and title block for generating SK revision/clarification drawings.

Parameters:

• Sketch Title: Can be entered, or can take the layout name in PM
• Scale: Use Archicad scale, 'no scale', or custom text.
• SK number: May (should) be omitted for automatic generation in PM
• Sheet Reference (optional)
• Project Name
• Issue Date, Past issue dates, and the ability to remember past dates.

Features:

• Interior mask with optional frame, for isolating the drawing part you need. The frame area can be drawn as the object is placed using the Box or Rotated Box methods of the Object tool. The mask can be removed, maxing out the available paper area, by stretching the mask to its maximum size. Note: The masked area will always be centered on the sheet.

• Check the 'Today' box to put today's date in the date fields. If there is a previous issue date, it will be bumped down the list. Or,

• Set the date manually and then check the 'Store Custom Date' box, which also retains the previous dates.

(Note: Both of these checkboxes are designed to uncheck themselves once they have done their work. Don't check them again!)

• The date saving is controlled by the 'Remember Dates' box, and can be turned off.

Use:

• Place in Archicad. Set the SK number to 'Auto in PlotMaker'. Place Hotspots at the corners. Save a view of the sketch area. Import this view into PM, using a layout linked to the 'SK' Master. Print the layout from PM.

• Place in Archicad. Marquee the object, snapping to the corners of the white space. Print, using the 'Marquee Area' option. For this option, you must set the SK number manually. This method is not recommended, since the SK number isn't generated automatically, and the SK isn't saved.

• Scan a hand drawing or other image. Create a layout in PM, using the 'SK Blank + Title' Master.

Place the object and its hotspots on the layer '+Z SK Title'. This layer is hidden and unlocked in all layer combinations. Before placing the object, set the layers/view to one of the output LCs. (E.g., A1) Then either turn on the '+Z SK Title' layer manually, or set the object tool to the layer and click 'show layer' in the 'layer is hidden' dialog box. Save the view with the layers as they are. It isn't a layer combination, but the view won't care. The alternative is to create LCs for every output LC plus the SK Title layer. Too much.

Very Important Note: The object must be brought to front. You might also have to send something back a step to get it hidden. There is no way to automate this. Sorry.

See also:
Sketch Revisions (SKs)
Getting the SK Layout Tools into Current Projects

[Note: This object has been superseded.]

This is the stamp you will use most of the time. Right now it's the only one we have.

It's pretty hard to tell it apart from the Room Name object. There are some differences.

The name list is hooked up to the Room Name parameter of the zone tool, which lets you select from the list in the info box.

The text size of the name is also available in the info box. The size for the material label is only in the settings, though.

There are parameters for the crown type, base type, and ceiling finish, for use in generating a finish schedule. Note: You must enter these. They don't learn from the room automatically, yet.

Location: 04 Masonry

A brick arched wall niche. Duh. Right now it can only do a semicircular arch. It will draw the brick lines on the sides and around the arch. The sill is optional.

In plan, the niche will display correctly. If using the Reflected Ceiling Plan display option, the niche will disappear completely, as if if it was a regular window. Consider using a patch.

« Newer | All Entries | 1 | 2 | 3 | 4 | 5 | 6 | 7 | 8 | 9 | 10 | 11 | 12 | 13 | 14 | 15 | 16 | Older »