On Land

Environment Information
At Rill Architects we run ArchiCAD on macOS. If you work at Rill, this is your stuff. If you don't, but you work in ArchiCAD, you may find something interesting. Anybody else, I don't know.
RSS
Objects Archive

« Newer | All Entries | 1 | 2 | 3 | 4 | 5 | 6 | 7 | 8 | 9 | 10 | 11 | 12 | 13 | 14 | 15 | 16 | Older »

The new one is better.

arches
(A door.) Location: 04 Masonry

Make it Flat or not. If it's arched, you can set either the Spring Height or the Arch Height, and the other dimension will change to maintain the overall height.

You can show Joint Lines representing the stones, and set a Stone Max Width. The lines use the Joint Pen. (The lines on the old arch broke in AC10.)

Turn the keystone off by setting the Keystone Height to zero. The Key Base Width controls the width of the keystone. (At this time, the flat arch can't have a keystone.)

arches
Jambs of two arches
Plan: The nice thing about this arch is that it can show a proper jamb in plan, using the Plan Veneer Thickness. You can set the Fill and the Separator Pen (for the line between the jamb fill and the wall proper). The background color of the fill comes from the wall.

The overhead lines (Cased Op Lines) can be switched off individually.

Mitered Cabs
Two mitered blobs
Location: 12 Furnishings / Casework

Despite the version number, a minor update to the Cab Blob. Now you can miter it. No, they don't do that in real life; it's a 'blob' remember.

Also, almost unintentionally, this is the first 'important' object I'm no longer maintaining in AC9. There will be more of this going forward as 9 finally goes under for the last time.

Automatic titles are not new to 10, but title objects are new, and now that they are objects, we can use them, which is new.

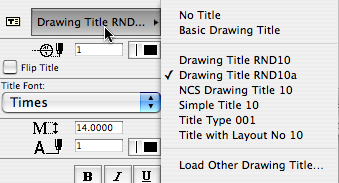
A drawing title is essentially a marker for a drawing element. Like section markers, detail markers, symbol labels, and door/window markers, you choose the title from a popup menu rather than from an object-type browser.

Drawing title list

As with all markers, there's no way to restrict the list. It shows all the loaded drawing titles, and it's up to you to pick the right one.

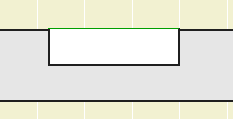
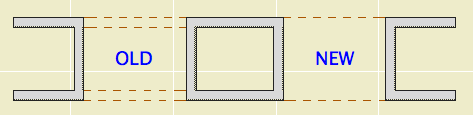
Elevations, sections, site plans, and details should all use automatic titles. Plans are the only drawing which has an object (Plan Title RND10) in the window. PDFs placed for notes ordinarily shouldn't have a title. Scanned details might, it depends.

Since the title and its settings are part of the drawing element's settings, you can change them in groups using the Drawing Manager. (Note: You must have a layout as the frontmost window to do this; otherwise the title tab is grayed out.)

Drawing Title RND10a is very similar to Drawing Title RND9a. There's a couple of 10-specific changes:

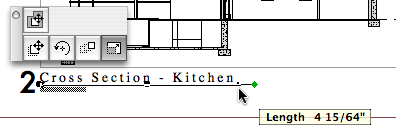
• By default, the title uses the name of the drawing (which should come from the name of the view, which should come from the name of the window). You can put in a custom text under the 'Title' tab in the drawing settings dialog.

• Titles don't have a length parameter like a regular object. So the Length parameter controls the length. You would normally adjust this graphically:

Title stretch

The length still has a minimum equal to the title text length.

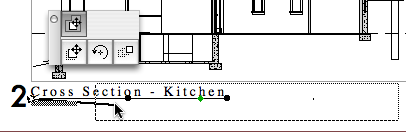
Again I have to apologize for issuing a '10a' revision. There was one issue with Drawing Title RND10 that I couldn't fix in place. That title would appear right on the corner by default. The new one appears 3/8" below the corner, which makes it easier to move the title as needed. Note the 'move marker' palette button:

Drawing drag

And, full disclosure, I broke the minimum length thing, but now that's fixed.

UPDATE 2007-12-11:

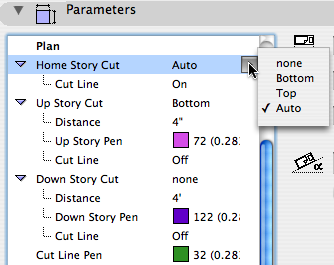
• You can set the Orientation of the title. You can have the title rotate to align with the Drawing (default), the Layout, or a Custom Angle. Use the Layout option to keep the title horizontal when you rotate a drawing. This is optional, and it's not always right. For example, if you rotate a wall section to fit on the sheet, the title should rotate too. I can't think of a purpose for Custom Angle, but it wasn't hard to put in there. If you do ever use it, the angle is graphically editable.

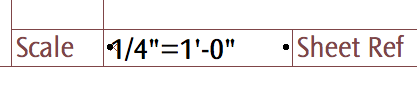
• You can choose a manual scale from a list. Leave the field empty to use the drawing's true scale. This is usually correct. To show no scale text, choose 'blank' from the list. You need to set a manual scale for a scanned detail PDF; now you can choose it from a list.

Location: 01 General / 5 Title & Layout

SK Hints

Very, very simple. A text showing a standard scale, which you can choose from a list. The primary use will be placement in the SK layouts' scale field.

Why? I don't like typing scales. And no, it's not easy to get the scale of the placed drawing automatically, though it should be.

Use it for SK addenda.

Date Formats
Options
Location: 01 General / 1 Graphic Symbols

A text object for writing the date.

If Auto Update is on, the date will be read from the system. (Tip: turn it on and then off to get today's date while keeping it from updating by itself tomorrow.) The Year, Month, and Day can be set manually using the pulldowns.

There are a lot of Date Format options. I've tried to cover all the conventions that I know of.

Any of the formats with a separator character will use the character given in Date Separator. You can choose from the list or make something up.

Two-Digit Day will zero-pad single digit days.

Day of Week can be on or off. If it's on, it will be read automatically along with the rest of the Auto Update. It will not fix itself for a manually set date. (It doesn't know the 30th is a Tuesday.) The Format of the day of the week can be long or short. Note that the list will always give the short form. The day of the week can be followed by an arbitrary separator, where the default is a comma.

You can add Leading or Trailing Text.

Text Formatting: All the usual suspects. Font, size. (You can choose mm or points to define the units.) Bold, italic, underline. The object can be anchored by any of the nine typical text block spots, using the Horizontal and Vertical Anchor parameters. You can have a Background Pen and the Outline Pen. Setting either one to zero turns it off. Finally, you can set the Padding between the text and the background/outline polygon. (This uses the same units option as the text size.)

Non-locals who would like to try it out can download it here.

Kinda silly, but.

You can turn off the fluting in Fluted Column JM9. You normally wouldn't do this. You would use Tuscan Column JAM8. But that column doesn't have the option of turning off the base. So if you need a smooth column with no base, use a fluted column and turn the base off.

Someday I'll add a base switch to the Tuscan Column, but this was an easier quick fix.

Location: 06 Wood & Plastic / Columns & Pilasters

Original here.

Added the ability to extend the side fill along the ceiling on either side, even at an angle.


The spot at the end stretches the length, and the spot in the middle adjusts the angle.

Niche
Location: 13 Special Construction

A rectangular or arched shape for subtracting niches into walls.

If the Arch Height is zero, the top is flat. The Wall Pen draws a heavy line around the back of the niche, to match the weight of the wall's contour.

The side with the center node should go along the edge of the wall. That side is drawn with the object's pen.

The idea is to SEO subtract the object from the wall, as discussed here. You can use a window to cut a niche, but the subtraction gives you better display control.

You would typically place the object on the layer X SEO Show2. This is the layer for SEO operators that show in plan only. (In 3D views, you would see the niche, but not the operator itself.)

You might need to bring the object forward to make sure it masks the wall. The parameter Edge Nudge helps make sure the lighter edge line of the object covers the heavier wall contour line underneath. Turn on True Line Weights to check it, and increase the nudge as needed.

Niche cutter plan

Download (AC10)

A minor tweak of the venerable rod and shelf. If Wall Line is on, you get a line at the back of the object, drawn with a dedicated Pen. This pen should match the pen of the wall. The new parameter is on by default with pen 15.

Why. Because if the shelf's plan fill is on, it tends to obscure the wall's contour. You could correct this by bringing the wall forward, but now you don't have to.

Historical note: As far as I can tell, this was my first object in GDL, with a date of 9 August 1999.

Everything in Stair Body JM9a still applies.

Major feature added: You can choose to have the stair cut by the Floor Plan Cut Plane. Recommended.

With the 'Auto' cut setting, you can choose to show a Cut Fill instead of the cut line. This will show the true cut thickness of the stair, similar to the roof element behavior.

Minor feature added: Separate cut line switches for the above and below stories.

Auto cut option

Two parameters added to the 'Plan' options in the Interior JAM9 door, so you can turn off either side of a cased opening. The parameters are 'Cased Op Line (Swing)' and 'Cased Op Line (Opp)'. Both are on by default. (Note: You will only see them in the parameter list, not the interface pages.)

This feature address this condition, where openings in each of two walls are supposed to look like one thick opening:

Cased Opening Lines

Swing = the clicked side when the door was placed. Yes, it can be tricky to tell which is the swing side of a cased opening, but there's nothing else to call it. If one switch doesn't do what you want, try the other one.

I'll probably add this feature to all the threshold lines when I next update the doors, which will be after the transition to 10 is complete.

Grid Cell
Location: 1 General / Title & Layout

(Again, pardon the 'a'. Some things can't be fixed in place.)

This object represents the available area of a detail sheet grid cell, or group of cells. Use it in your details to plan how the detail will lie in the cell. Very similar to Sheet Area RND10, which is used for plans.

More»

« Newer | All Entries | 1 | 2 | 3 | 4 | 5 | 6 | 7 | 8 | 9 | 10 | 11 | 12 | 13 | 14 | 15 | 16 | Older »